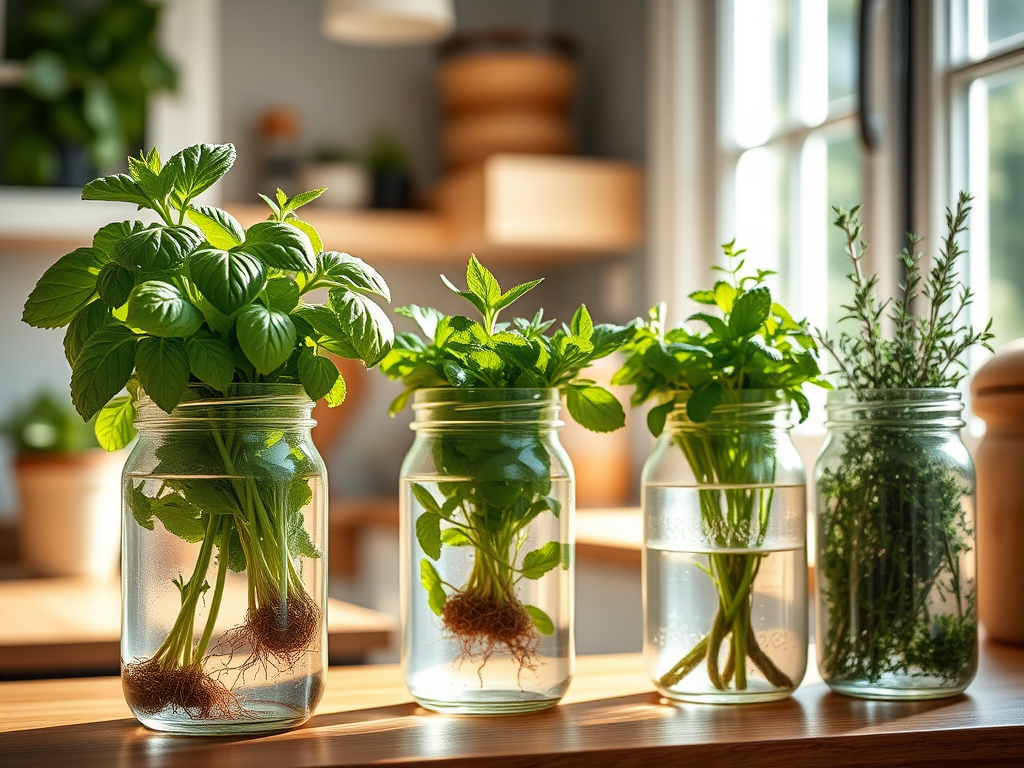
6 Perfect Herb Pairings to Grow Together in a Large Container

Growing herbs in containers is a great way to enjoy fresh flavors right at your doorstep. But did you know some herbs grow even better when paired together? Certain herbs have complementary growth habits, water needs, and pest-repelling properties, making them perfect container companions. Here are six herb pairings to try, along with tips on how to plant and care for them.

1. Basil & Parsley

Why They Work Together:

Basil and parsley both love moist soil and full sun. While basil enjoys warm weather, parsley is a bit more tolerant of cooler temperatures, making this a great pairing for most seasons.

How to Plant:

  • Choose a large container (at least 12 inches wide and deep) with drainage holes.
  • Fill with well-draining potting mix enriched with compost.
  • Plant basil on one side and parsley on the other, leaving about 6-8 inches between them.
  • Water well after planting.

Care Tips:

  • Keep soil evenly moist but not soggy.
  • Place in full sun (6-8 hours daily).
  • Pinch basil leaves regularly to encourage bushy growth and prevent flowering.
  • Harvest parsley stems from the outer edges to promote continuous growth.

2. Rosemary & Thyme

Why They Work Together:

Both rosemary and thyme thrive in drier conditions and prefer well-draining soil, making them ideal for growing together.

How to Plant:

  • Use a terra cotta pot or another container that allows for good drainage.
  • Fill with sandy, well-draining soil (mix potting soil with sand or perlite).
  • Plant rosemary toward the center and thyme near the edge, as thyme tends to spill over.

Care Tips:

  • Water only when the soil is dry to the touch.
  • Place in full sun (at least 6 hours of direct sunlight).
  • Trim rosemary lightly to maintain shape and harvest thyme regularly to prevent it from becoming woody.

3. Mint & Chives

Why They Work Together:

Mint and chives both thrive in moist soil and can handle partial sun, making them a great pair for a shadier patio or balcony.

How to Plant:

  • Use a deep container (at least 12 inches deep) to control mint’s spreading roots.
  • Fill with nutrient-rich, well-draining soil.
  • Plant mint on one side and chives on the other, leaving space for both to spread.

Care Tips:

  • Keep the soil consistently moist but not soggy.
  • Place in partial to full sun (4-6 hours of sunlight).
  • Trim mint frequently to prevent it from taking over the container.
  • Harvest chives by cutting at the base to encourage new growth.

Final Thoughts

Pairing herbs in containers not only saves space but also creates a natural balance that promotes healthy growth. Whether you have a sunny patio or a shaded balcony, there’s an herb pairing that can thrive in your space. Try these combinations and enjoy a fresh supply of herbs all season long!

What are your favorite herb pairings? Share your experiences in the comments!

How to Grow and Harvest Dill: A Gardener’s Guide

Dill (Anethum graveolens) is an aromatic herb known for its feathery foliage and distinct flavor. It’s a fantastic addition to herb gardens, perfect for seasoning dishes, pickling, and even attracting beneficial insects to your garden. If you’re ready to grow dill from seed and learn how to care for it, keep reading!

Growing Dill from Seed

Dill is best grown directly from seed, as it has a delicate taproot that doesn’t transplant well. Here’s how to start your dill successfully:

  1. Choose the Right Location – Dill thrives in full sun and well-draining, slightly acidic to neutral soil (pH 5.5-7.5). Choose a spot that receives at least 6-8 hours of sunlight daily.
  2. Sow Seeds Directly – In early spring (after the last frost), scatter the seeds about ¼ inch deep in the soil, spacing them around 12 inches apart. Keep the soil moist until germination, which usually takes 10-14 days.
  3. Succession Planting – To ensure a steady supply of fresh dill throughout the season, plant seeds every few weeks until midsummer.

Caring for Dill

Once your dill seedlings emerge, follow these care tips to keep them thriving:

  • Watering – Dill prefers evenly moist soil but doesn’t like to sit in water. Water regularly, especially during dry spells.
  • Thinning & Spacing – When seedlings reach about 2 inches tall, thin them to about 12 inches apart to give them space to grow.
  • Support – Tall dill plants can become top-heavy. If needed, stake them gently to prevent bending or breaking.
  • Companion Planting – Dill grows well alongside cucumbers, lettuce, and onions but should be kept away from carrots and tomatoes to prevent growth interference.
  • Pest & Disease Prevention – Dill is relatively pest-resistant, but aphids can be a problem. Encourage beneficial insects like ladybugs to keep pests in check.

Harvesting Dill

Dill can be harvested for both its leaves (dill weed) and seeds.

  • Harvesting Leaves – Begin harvesting the feathery leaves when plants reach about 8 inches tall. Snip the leaves close to the stem as needed, always leaving some foliage for continued growth.
  • Harvesting Seeds – When the flowers develop and start to turn brown, cut the seed heads and hang them upside down in a paper bag to dry. Once dry, shake the bag to collect the seeds for culinary use or replanting.

Storing and Using Dill

  • Fresh Dill – Store fresh dill leaves in a glass of water in the refrigerator for a few days or freeze them in an airtight container.
  • Drying Dill – Air-dry dill leaves in small bundles, then crumble and store in an airtight jar.
  • Dill Seeds – Store dried seeds in a cool, dark place for use in pickling, seasoning, or next season’s planting.

Final Tips for a Thriving Dill Crop

  • Let some plants go to flower to attract pollinators and beneficial insects.
  • If growing in containers, choose a deep pot to accommodate the taproot.
  • Avoid transplanting seedlings, as dill dislikes being moved once established.

With these tips, you’ll enjoy a lush and flavorful dill harvest all season long! Whether you’re growing dill for its fresh leaves or its seeds, this hardy herb is a great addition to any garden. Happy gardening!

Jade Plant Care Guide: How to Grow and Maintain This Resilient Succulent

The jade plant (Crassula ovata), also known as the lucky plant or money tree, is a stunning and easy-to-care-for succulent that can thrive indoors and outdoors. With its thick, glossy green leaves and woody stems, this plant is not only a favorite for gardeners but is also said to bring good luck and prosperity!

Whether you’re a beginner or a seasoned plant enthusiast, here’s everything you need to know about planting and caring for a jade plant.

How to Plant a Jade Succulent

1. Choosing the Right Pot

Jade plants require a pot with good drainage to prevent root rot. A terra-cotta or ceramic pot with drainage holes works best since it allows the soil to dry out between waterings.

2. Selecting the Best Soil

Well-draining soil is key! Use a succulent or cactus mix, or make your own by mixing regular potting soil with sand or perlite to improve drainage.

3. Planting the Jade

  • Fill the pot halfway with soil.
  • Place the jade plant in the center and gently spread out the roots.
  • Add more soil around the plant, leaving about an inch of space at the top.
  • Lightly pat down the soil and water it sparingly.

Jade Plant Care Instructions

Watering

Jade plants store water in their thick leaves, so they don’t need frequent watering. Follow the “soak and dry” method:

  • Water deeply, allowing excess water to drain out.
  • Let the soil dry out completely before watering again.
  • In summer, water every 2-3 weeks. In winter, water once a month or less.
  • Avoid overwatering, as it can lead to root rot.

Light Requirements

Jade plants love bright light!

  • Place your jade plant in bright, indirect light or a south-facing window indoors.
  • If growing outdoors, give it morning sun and afternoon shade to prevent sunburn.
  • If leaves turn red or yellow, the plant may be getting too much direct sunlight.

Best Soil for Jade Plants

Jade plants thrive in well-draining, sandy soil. A good mix includes:
✔ 2 parts cactus soil
✔ 1 part perlite or sand
✔ Optional: A handful of pumice for extra drainage

Additional Care Tips

Fertilizing – Feed your jade plant with a diluted succulent fertilizer once a month in spring and summer. Avoid fertilizing in winter.
Pruning – Trim leggy growth to encourage a fuller shape. You can propagate cuttings by letting them dry for a day and planting them in soil.
Repotting – Jade plants grow slowly and only need repotting every 2-3 years or when they outgrow their pot.

Final Thoughts

Jade plants are one of the easiest succulents to grow, making them perfect for beginner gardeners. With the right care, your jade plant can live for decades, becoming a beautiful and rewarding addition to your home or garden.

Do you have a jade plant? Share your care tips in the comments below! 🌿✨

What to Plant in March: Flowers, Herbs & a Fun DIY Garden Project

March is the perfect time to shake off the winter chill and get your hands in the dirt! With the arrival of warmer days and longer sunlight hours, your garden is ready for fresh flowers, flavorful herbs, and a simple DIY project to bring new life to your space. Whether you’re working with garden beds, containers, or a balcony setup, here’s what you should be planting this month.

Flowers to Plant in March

March is prime time for cool-season flowers and early spring blooms. Here are a few that thrive when planted now:

🌸 Pansies & Violas – These cheerful blooms are cold-hardy and add a pop of color to your garden beds and pots.

🌼 Daffodils & Tulips – If you missed the fall planting window for bulbs, you can still grab pre-sprouted ones from garden centers for a quick burst of spring color.

🌿 Snapdragons – These tall, vibrant flowers attract pollinators and thrive in early spring temperatures.

🌺 Sweet Peas – Climbing sweet peas love the cool weather and will reward you with fragrant blossoms if planted now.

🌻 Calendula – A bright, sunshine-colored flower that’s not only beautiful but also has skin-soothing properties!

Herbs to Plant in March

Fresh herbs are a must-have for any spring garden! March is the perfect time to start these flavorful additions:

🌿 Cilantro – Loves cool weather and grows quickly. Harvest frequently for the best flavor.

🌿 Parsley – A slow grower, but well worth planting now for fresh garnishes all season long.

🌿 Chives – A hardy perennial herb that comes back year after year. Snip fresh chives for soups, eggs, and salads.

🌿 Thyme – Thrives in both garden beds and containers. Great for seasoning meats, veggies, and sauces.

🌿 Mint – A fast-growing herb that’s perfect for tea, mojitos, and fresh salads (but keep it contained as it can spread aggressively).


DIY Garden Project: Make a Charming Spring Bee Bath

Pollinators like bees, butterflies, and ladybugs are essential for a thriving garden. A simple way to welcome them is by creating a bee bath—a shallow water source where they can safely drink and rest. You can create this with your supplies or purchase a watering pollinator station at the link: https://www.etsy.com/listing/1871174519/watering-bee-station-wildflower-seed-kit?ref=shop_home_active_2&crt=1&logging_key=93f8593349bb019865d8291fa7e86f520866ccb6%3A1871174519

What You’ll Need:

  • A shallow dish (ceramic plant saucer, small bowl, or old pie tin)
  • Small stones or pebbles
  • Water
  • A sunny spot in your garden

How to Make It:

  1. Find a spot – Choose a sunny, sheltered location in your garden.
  2. Add pebbles – Fill the dish with small stones or pebbles. This gives bees a safe place to land while drinking.
  3. Fill with water – Pour in just enough water so the tops of the pebbles remain exposed (bees can’t swim and need dry spots to perch).
  4. Maintain – Refill with fresh water regularly to keep your bee bath clean and inviting.

This quick and easy project helps support local pollinators and adds a charming touch to your garden. Plus, it pairs perfectly with your spring-planted flowers and herbs!


Are you starting your garden this March? Let me know what you’re planting! 🌱💛 Happy gardening!

Best Air Plants to Give as Gifts – Easy-Care Varieties for Beginners

Looking for a unique, low-maintenance plant gift? Air plants (Tillandsia) make the perfect present for plant lovers and beginners alike! These fascinating plants don’t need soil, are easy to care for, and can be displayed in countless creative ways. Whether you’re gifting to a friend, a teacher, or a fellow plant enthusiast, here are some of the best easy-care air plants that will thrive in any home.

🌱 1. Tillandsia Ionantha – The Classic Choice

Why It’s Great: One of the most popular air plants, the Ionantha is small, hardy, and adaptable. It has beautiful green leaves that blush red or pink before blooming, making it a visually exciting gift.

Care Tips:

  • Likes bright, indirect light.
  • Water 1–2 times a week with a good soak.
  • Prefers good air circulation, so don’t keep it in a closed terrarium for too long.

🌿 2. Tillandsia Stricta – Low-Maintenance and Fast-Growing

Why It’s Great: Stricta is an excellent beginner plant because it’s forgiving and grows quickly. It has soft, grassy leaves and produces gorgeous pink or purple blooms.

Care Tips:

  • Does well in both humid and dry environments.
  • Requires only occasional misting in high humidity or soaking in dry conditions.
  • Thrives in bright, indirect light but can tolerate some shade.

💜 3. Tillandsia Medusa (Caput-Medusae) – The Statement Piece

Why It’s Great: With its wild, curling leaves that resemble Medusa’s hair, this air plant makes a bold and unique gift! It’s drought-tolerant and easygoing, making it a great pick for busy plant owners.

Care Tips:

  • Enjoys bright, filtered light.
  • Soak every 7–10 days, letting it dry completely.
  • Loves a bit of airflow—perfect for placing near a window.

🌾 4. Tillandsia Brachycaulos – A Colorful Surprise

Why It’s Great: This plant transforms into a stunning red or pink color when getting ready to bloom. It’s an excellent gift for anyone who loves a bit of drama in their plants!

Care Tips:

  • Water by misting regularly or soaking once a week.
  • Keep in bright, indirect sunlight for the best color.
  • Avoid placing in a completely enclosed terrarium—it loves fresh air!

🌊 5. Tillandsia Bulbosa – The Fun & Quirky Pick

Why It’s Great: Bulbosa’s wavy, tentacle-like leaves give it a whimsical, alien-like appearance. It’s an eye-catching air plant that thrives with minimal care.

Care Tips:

  • Prefers bright, indirect light but tolerates some shade.
  • Soak once a week for best results.
  • Its unique shape makes it perfect for hanging displays or driftwood mounts.

🎁 How to Gift an Air Plant

Pair your air plant gift with a fun display idea! Try:
✨ A small glass terrarium with decorative sand or pebbles
✨ Attaching the plant to a piece of driftwood for a natural touch
✨ Placing it inside a seashell or cute ceramic holder
✨ Wrapping it in a gift box with a care card

Air plants are a thoughtful, easy-to-care-for gift that brings a little piece of nature into any space. Whether for a birthday, holiday, or just because, these beginner-friendly varieties are sure to impress!

🌿 Want to start gifting air plants today? Check out my shop for unique air plant planters and live air plants!

📖 New to air plants? Read my Air Plant Care Guide to learn everything you need to keep them thriving!

Which air plant is your favorite to gift? Let me know in the comments! 🌿💚

Home is Where the Boat Is

Potting, Puttering & Pontooning

Cats and Trails and Garden Tales

Musings on cats, travel, gardens and life

Leaf And Twig

Where observation and imagination meet nature in poetry.

phillipsplace

A new beginning, mobile home living, adding our style inside and out.

Ruth E. Hendricks

Daily Journal of Life in Pittsburgh

The Haute Mommy Handbook

Motherhood Misadventures + Creative Living

Suzanne's Mom's Blog

Arts, Nature, Good Works, Luna & Stella Lockets & Birthstones

𝑻𝒐𝒓𝒏𝒂𝒅𝒐 𝑶𝒇 𝑪𝒉𝒂𝒐𝒔 🌪

Thoughts, experiences and learnings in a turbulent time

Sarah Rajkotwala - Author & Spiritual Teacher blog

Gardening Fairies Flowers Spirituality Angels Love Joy

Ideas and Advice for How To Live a Joyful and Empowered Life.

All Things Empowering - Healing Ourselves & Earth, Self-Sufficiency, Food Forests, Gardening, Art, Road Trips, Preserving, Foraging, Permaculture, Homesteading and More!

AmericaOnCoffee

We’re just inviting you to take a timeout into the rhythmic ambiance of our breakfast, brunch and/or coffee selections. We are happy whenever you stop by.

Heart to Hearth Cookery

Sharing my Experimental Archaeology of Food

The Herb Society of America Blog

Learn • Explore • Grow