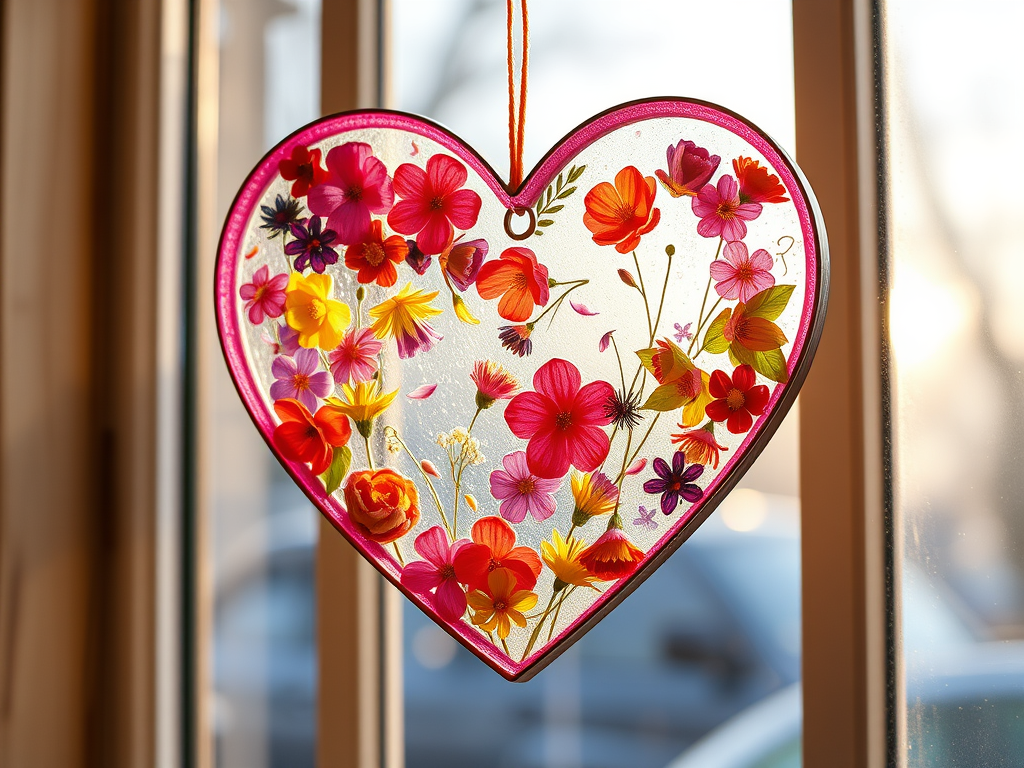
Would You Love a Plant or Seed Subscription?

Hello, plant lovers! As we approach the end of the year, I’ve been reflecting on all the incredible ways to make gardening and plant care more accessible, fun, and rewarding. One idea that’s been blooming in my mind is offering a plant and seed subscription plan for next year. But before I get too far ahead, I need your input!

Imagine this: each month, you receive a carefully curated package delivered right to your door. It could include a delightful succulent, a unique air plant, or an assortment of seeds perfect for starting or expanding your garden. Each package would also come with detailed care instructions, planting tips, and maybe even a surprise bonus or two—think decorative pots, plant tags, or fertilizer samples.

Here’s what I’m considering for the subscriptions:

  • Succulent Subscription: A new succulent variety each month, ranging from trendy rosettes to trailing beauties, ideal for both beginner and experienced plant parents.
  • Air Plant Subscription: A monthly delivery of air plants, including some rare or unusual varieties, with creative display ideas and care tips.
  • Seed Subscription: Seasonal seeds to grow flowers, herbs, or vegetables, perfect for container gardening or adding color to your yard.

This could be a wonderful way to:

  • Expand your plant collection.
  • Try new species you might not have picked up on your own.
  • Stay inspired and connected to the gardening community year-round.

I’m so excited about the potential, but I want to make sure this idea resonates with you. Here are a few questions I’d love for you to answer in the comments or via DM:

  1. Would you be interested in a plant or seed subscription?
  2. Which type of subscription excites you most: succulents, air plants, seeds, or a mix?
  3. What price range would feel reasonable for a monthly subscription?
  4. Are there any special features you’d love to see included (e.g., themed months, eco-friendly packaging, DIY projects)?

Your feedback is incredibly important as I shape this plan. My goal is to offer something that brings you joy and enhances your gardening journey. So, let me know your thoughts and suggestions—I can’t wait to hear what you think!

Thank you for growing with me. Here’s to more green adventures in the coming year!

How to Get Your Christmas Cactus to Bloom and Thrive Year-Round

The Christmas cactus (Schlumbergera) is a popular houseplant known for its stunning flowers that brighten the holiday season. However, getting this beauty to bloom and ensuring its health throughout the year requires specific care. Here’s a guide to help your Christmas cactus thrive.

Understanding Your Christmas Cactus

Unlike desert cacti, the Christmas cactus is a tropical plant native to Brazil’s rainforests. Its natural environment is humid and shaded, which means it has unique care needs.


How to Encourage Blooming

  1. Simulate Short Days: Christmas cacti are short-day plants, meaning they need long nights to initiate blooming. Starting in mid-October, ensure your plant gets 12-14 hours of darkness each night for about six weeks. Place it in a dark room or cover it with a breathable cloth.
  2. Provide Cool Temperatures: Aim for nighttime temperatures between 50-55°F (10-13°C) during the pre-blooming phase. Cooler temps signal the plant to produce buds.
  3. Water Sparingly: During this time, reduce watering. Allow the top inch of soil to dry out between waterings. Avoid overwatering, as it can cause bud drop.
  4. Feed Lightly: Use a fertilizer high in potassium, such as a bloom booster, every two weeks during the budding period to encourage vibrant blooms.
  5. Avoid Disturbance: Once buds form, avoid moving the plant or exposing it to drafts. Sudden changes in light or temperature can cause buds to fall off.

Year-Round Care for a Healthy Christmas Cactus

  1. Light Requirements: Place your cactus in bright, indirect light. Avoid direct sunlight, which can scorch its leaves. East-facing windows are ideal.
  2. Watering:
    • Spring and Summer: Water when the top inch of soil feels dry.
    • Fall and Winter: Reduce watering as the plant enters dormancy. Always use room-temperature water and ensure the pot has proper drainage to prevent root rot.
  3. Humidity: Tropical plants love humidity. Mist the plant occasionally or place a tray of water nearby to increase moisture in the air.
  4. Fertilizing: Feed with a balanced houseplant fertilizer (20-20-20) once a month during the growing season (spring through early autumn). Stop feeding in late fall as the plant prepares for dormancy.
  5. Repotting: Repot every 2-3 years in spring, using a well-draining cactus or succulent mix. Avoid pots that are too large, as Christmas cacti prefer being slightly root-bound.
  6. Pruning: After blooming, prune the plant to encourage branching and new growth. Twist off a few segments from each stem and use them for propagation if desired.

Troubleshooting Common Issues

  • Bud Drop: Often caused by overwatering, drafts, or sudden changes in light or temperature.
  • Wilted Leaves: May indicate underwatering, overwatering, or poor drainage.
  • No Blooms: Likely due to insufficient darkness or inconsistent care during the pre-bloom phase.

Conclusion

With the right care, your Christmas cactus can bloom beautifully year after year, becoming a cherished part of your holiday traditions. By understanding its tropical origins and adjusting care throughout the seasons, you can enjoy a healthy, thriving plant that graces your home with its festive flowers.

Have tips or stories about your Christmas cactus? Share them in the comments below!

Applesauce Ornaments

Applesauce ornaments are a fun and fragrant craft, especially for the holiday season. They are made using simple ingredients and can be customized with shapes and decorations. Here’s how to make them:

Materials Needed

  • 1 cup applesauce
  • 1 ½ cups ground cinnamon
  • Optional: ground cloves, nutmeg, or allspice (for added scent)
  • Rolling pin
  • Cookie cutters (holiday shapes work great)
  • Drinking straw or skewer (to make holes for hanging)
  • String, ribbon, or twine
  • Wax paper
  • Baking sheet or flat drying surface

Instructions

1. Mix the Dough

  1. In a bowl, combine the applesauce and cinnamon (plus any additional spices) to form a dough.
  2. Knead the mixture until it’s smooth and pliable. If it’s too sticky, add more cinnamon; if it’s too dry, add a little more applesauce.

2. Roll Out the Dough

  1. Place the dough between two sheets of wax paper.
  2. Roll it out to about ¼-inch thick.

3. Cut Out Shapes

  1. Use cookie cutters to cut shapes from the dough.
  2. Transfer the cut shapes onto a baking sheet or drying surface lined with wax paper.

4. Create Holes for Hanging

  1. Use a straw or skewer to make a small hole near the top of each ornament.

5. Dry the Ornaments

You have two options:

  • Air Drying: Let the ornaments dry at room temperature for 24-48 hours, flipping them occasionally to ensure even drying.
  • Baking: Bake the ornaments at 200°F (93°C) for 1-2 hours. Check periodically to prevent cracking.

6. Decorate (Optional)

  • Leave them as-is for a natural look, or decorate with acrylic paints, glitter, or fabric paint once dry.

7. String and Hang

Thread ribbon or twine through the holes and tie a knot to create a loop for hanging.

🌱 Get Free Herb Seeds with Any Purchase at Printhousedesign! 🌱

We’re excited to share a special offer with our Printhousedesign community! To show our appreciation for your support and to encourage your love for all things green, we’re including free herb seeds with every purchase at our Etsy shop! Whether you’re just starting your indoor garden or expanding your collection, these seeds are a wonderful way to add fresh, aromatic herbs to your home.

Why Herbs?

Herbs are the perfect addition to any garden, big or small. They’re not only practical and delicious in recipes, but they’re also easy to grow indoors or on a sunny windowsill. Imagine fresh basil, parsley, or rosemary at your fingertips, ready to elevate your cooking and add a fragrant touch to your kitchen or patio.

How It Works

From now until supplies last, each order you place at Printhousedesign will come with a complimentary packet of herb seeds. We’ve selected a variety of herbs that are easy to grow and care for, even for beginner gardeners.

What to Expect

  • Free Herb Seed Packet: Automatically included with your order—no need to add anything extra to your cart.
  • Easy Growing Guide: Each seed packet comes with simple instructions to get you started.
  • Eco-Friendly Packaging: In line with our love for nature, the seeds are packed in eco-friendly packaging.

Grow Your Garden with Printhousedesign 🌿

This seed giveaway is our way of saying “thank you” and sharing the joys of gardening with our wonderful customers. Whether you’re getting one of our 3D printed nature-inspired planters or browsing our gardening essentials, you’ll have everything you need to grow your own little herb garden.

Take advantage of this offer by visiting our Etsy shop, Printhousedesign, and start growing your own herbs today!

Happy planting and happy shopping! 🌱

How to Get Your Air Plant to Bloom 🌸

Hello, green thumbs! Today, let’s dive into one of the most exciting stages of air plant care—encouraging your plant to bloom! While air plants (Tillandsia) are known for their versatility and ease, it can take a bit of extra care to see that beautiful, colorful flower. Here are some tips to help your air plants thrive and blossom.

1. Understand the Blooming Cycle 🌱

Air plants usually bloom only once in their lifetime, so it’s a special event! The bloom is often short-lived but beautiful, showing off vibrant pinks, purples, reds, or oranges. Blooming typically signals the end of an air plant’s life cycle, but don’t worry—after blooming, air plants produce “pups” (baby plants) that will continue the cycle.

2. Provide Proper Lighting ☀️

Air plants thrive in bright, indirect sunlight, and this is especially important for blooming. If they’re indoors, place them near a bright window or under fluorescent lighting. Too much direct sunlight can scorch them, so avoid positioning them in the path of strong rays. Outdoors, they love dappled sunlight or partial shade.

3. Regular Soaking 💧

To encourage blooming, keep your air plant well-hydrated. Soak it in room-temperature water for 20–30 minutes once a week. After soaking, shake off excess water and let it dry upside down to prevent any water from sitting in the base, which can cause rot. For dry or hot climates, a light misting every couple of days can keep it extra happy.

4. Add a Little Air Plant Fertilizer 🌱

Using a bromeliad or air plant-specific fertilizer once a month can boost your plant’s blooming potential. Dilute the fertilizer in water according to the instructions, and soak your air plant in the mixture as usual. Avoid over-fertilizing, as this can cause leaf damage. A little boost goes a long way!

5. Temperature and Humidity 🌡️

Air plants are happiest in temperatures between 50–90°F, so try to keep them in these ranges if possible. While they can adapt to drier conditions, air plants naturally prefer moderate to high humidity, which helps stimulate blooming. You can increase humidity by misting or by placing a small dish of water nearby (though not directly under the plant).

6. Be Patient 🌼

Blooming is a natural process that often requires time. Some air plants, especially larger varieties, can take years to bloom, so don’t get discouraged if you don’t see blooms right away. With consistent care, your air plant will reward you in its own time.

Bonus Tip: Ethylene Gas Trick 🍎

Some air plant enthusiasts swear by using ethylene gas to encourage blooming! Place your air plant in a sealed container with a ripe apple or banana for a few days. The gas released from the fruit can trigger blooming. Be careful not to leave it too long, though, as too much exposure can harm the plant.

Blooming and Beyond 🌈

Once your air plant blooms, continue the same care routine. After the bloom fades, keep an eye out for pups growing at the base. These can be separated when they’re about half the size of the parent plant or left to create a cluster—a mini air plant family!

Happy blooming, and let me know if you see flowers on your air plants! Share your photos and stories—I’d love to see them!

Happy gardening!

Home is Where the Boat Is

Potting, Puttering & Pontooning

Cats and Trails and Garden Tales

Musings on cats, travel, gardens and life

Leaf And Twig

Where observation and imagination meet nature in poetry.

phillipsplace

A new beginning, mobile home living, adding our style inside and out.

Ruth E. Hendricks

Daily Journal of Life in Pittsburgh

The Haute Mommy Handbook

Motherhood Misadventures + Creative Living

Suzanne's Mom's Blog

Arts, Nature, Good Works, Luna & Stella Lockets & Birthstones

𝑻𝒐𝒓𝒏𝒂𝒅𝒐 𝑶𝒇 𝑪𝒉𝒂𝒐𝒔 🌪

Thoughts, experiences and learnings in a turbulent time

Sarah Rajkotwala - Author & Spiritual Teacher blog

Gardening Fairies Flowers Spirituality Angels Love Joy

Ideas and Advice for How To Live a Joyful and Empowered Life.

All Things Empowering - Healing Ourselves & Earth, Self-Sufficiency, Food Forests, Gardening, Art, Road Trips, Preserving, Foraging, Permaculture, Homesteading and More!

AmericaOnCoffee

We’re just inviting you to take a timeout into the rhythmic ambiance of our breakfast, brunch and/or coffee selections. We are happy whenever you stop by.

Heart to Hearth Cookery

Sharing my Experimental Archaeology of Food

The Herb Society of America Blog

Learn • Explore • Grow