Growing Lettuce: A Simple Guide from Planting to Harvest

Lettuce is a fantastic addition to any garden, providing fresh, crisp greens for salads, sandwiches, and more. Whether you’re a seasoned gardener or a beginner, growing lettuce from seeds is straightforward and rewarding. Follow these easy steps to plant lettuce seeds and learn when and how to harvest them.

Step 1: Choose the Right Time and Location

  1. Timing: Lettuce is a cool-weather crop. The best time to plant lettuce seeds is in early spring or late summer, as it thrives in temperatures between 60°F and 70°F (15°C and 21°C). If you live in a warmer climate, consider planting lettuce in the fall or winter.
  2. Location: Select a spot in your garden that gets partial to full sun. Lettuce can tolerate some shade, especially in warmer climates.

Step 2: Prepare the Soil

  1. Soil Type: Lettuce grows best in loose, well-draining soil rich in organic matter. If your soil is heavy clay or sandy, amend it with compost to improve texture and fertility.
  2. Soil pH: Aim for a soil pH between 6.0 and 6.8. You can test your soil with a home testing kit and adjust the pH if necessary by adding lime to raise it or sulfur to lower it.

Step 3: Planting Lettuce Seeds

  1. Seed Depth: Plant lettuce seeds about 1/4 inch deep. You can sow them directly in the garden or start them indoors 4-6 weeks before the last frost date and transplant the seedlings.
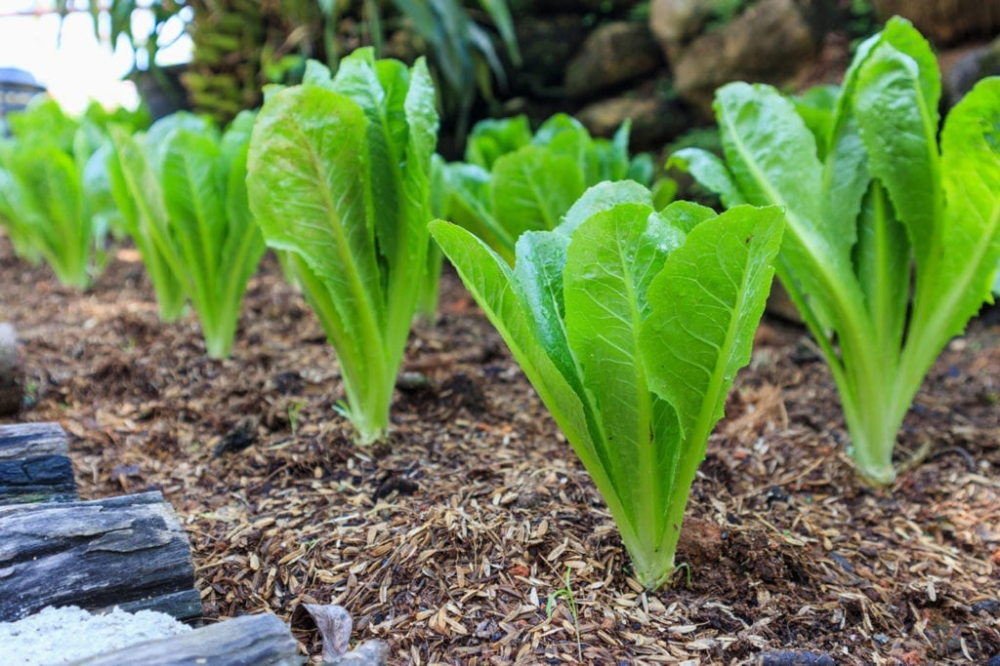
  2. Spacing: For loose-leaf varieties, space seeds about 1 inch apart, thinning to 4-6 inches apart once they sprout. For head lettuce, space seeds 12-18 inches apart.
  3. Watering: Keep the soil consistently moist but not waterlogged. Water gently to avoid displacing seeds.

Step 4: Care and Maintenance

  1. Watering: Regular, even watering is crucial for lettuce. Aim for about 1 inch of water per week, adjusting based on rainfall and temperature.
  2. Mulching: Apply a layer of mulch around the plants to retain moisture, suppress weeds, and keep the soil cool.
  3. Thinning: Thin seedlings if necessary to ensure proper spacing. This allows each plant enough room to grow and reduces competition for nutrients and water.
  4. Fertilizing: Lettuce is a fast grower and may benefit from a balanced, water-soluble fertilizer every two weeks, especially if your soil is not particularly rich.

Step 5: Harvesting Lettuce

  1. Timing: Harvest time depends on the type of lettuce you’re growing:
    • Loose-leaf varieties: These can be harvested as soon as the leaves are large enough to eat, usually about 4-6 weeks after planting.
    • Head varieties: Harvest when heads are firm and reach the desired size, usually about 8-10 weeks after planting.
  2. Method:
    • For loose-leaf lettuce: You can either pick individual leaves as needed, starting with the outer leaves, or cut the entire plant about an inch above the soil to encourage regrowth.
    • For head lettuce: Use a sharp knife to cut the head off at the base, or gently twist and pull to remove the whole plant.
  3. Storage: After harvesting, rinse the lettuce leaves or heads with cool water to remove any soil or debris. Pat dry and store in the refrigerator in a plastic bag or container. Freshly harvested lettuce can last up to a week.

Tips for a Successful Lettuce Crop

  • Succession Planting: For a continuous supply of fresh lettuce, plant seeds every 2-3 weeks.
  • Pest Control: Watch out for common pests like aphids and slugs. Use organic pest control methods, such as neem oil or hand-picking, to keep them at bay.
  • Bolt Prevention: Lettuce tends to bolt (flower and go to seed) in hot weather, which makes the leaves bitter. To prevent this, provide shade during the hottest part of the day and keep the soil consistently moist.

By following these simple steps, you’ll be able to enjoy a bountiful harvest of homegrown lettuce. Happy gardening!

4 Best Shade Plants for Your Garden

Gardening in the shade can be a delightful challenge, offering a chance to grow plants that thrive away from direct sunlight. Whether your garden is partially shaded by trees or completely sheltered from the sun, there’s a wealth of beautiful plants that can flourish in these conditions. Here are four of the best shade plants to consider for your garden.

1. Hostas (Hosta spp.)

Why They’re Great: Hostas are a classic choice for shady areas. Known for their lush foliage, they come in a variety of sizes, shapes, and colors, ranging from deep green to variegated patterns of green and white or yellow.

Planting Tips:

  • Soil: Hostas prefer well-draining, fertile soil rich in organic matter.
  • Watering: Keep the soil consistently moist, but avoid waterlogging.
  • Care: Mulch around the plants to retain moisture and suppress weeds. Watch out for slugs and snails, which can be a common problem.

Popular Varieties:

  • Hosta ‘Blue Mouse Ears’: Small, rounded blue-green leaves.
  • Hosta ‘Sum and Substance’: Large, chartreuse to golden leaves.

2. Astilbes (Astilbe spp.)

Why They’re Great: Astilbes add a splash of color with their feathery plumes of flowers that bloom in shades of pink, red, white, and purple. Their fern-like foliage also adds texture to shady garden spots.

Planting Tips:

  • Soil: They thrive in moist, well-draining soil that’s rich in organic material.
  • Watering: Regular watering is essential, especially during dry periods.
  • Care: Deadhead spent flowers to encourage more blooms. Divide clumps every few years to maintain vigor.

Popular Varieties:

  • Astilbe ‘Fanal’: Deep red flowers.
  • Astilbe ‘Bridal Veil’: White blooms.

3. Ferns (Various genera)

Why They’re Great: Ferns are perfect for adding a touch of woodland charm to your garden. Their delicate, lacy fronds provide excellent ground cover and come in a variety of textures and shades of green.

Planting Tips:

  • Soil: Ferns prefer humus-rich, well-draining soil.
  • Watering: They like consistently moist conditions.
  • Care: Ferns are generally low-maintenance. Simply remove dead fronds to keep them looking tidy.

Popular Varieties:

  • Japanese Painted Fern (Athyrium niponicum ‘Pictum’): Silver and burgundy fronds.
  • Maidenhair Fern (Adiantum spp.): Delicate, fan-shaped fronds.

4. Heucheras (Heuchera spp.)

Why They’re Great: Heucheras, also known as coral bells, are prized for their vibrant foliage that comes in an array of colors from deep purple to lime green. They also produce delicate flower spikes in late spring to early summer.

Planting Tips:

  • Soil: They do best in well-draining soil with a good amount of organic matter.
  • Watering: Keep the soil moderately moist.
  • Care: Remove old, faded leaves to encourage new growth. Divide plants every 3-4 years.

Popular Varieties:

  • Heuchera ‘Palace Purple’: Deep burgundy leaves.
  • Heuchera ‘Lime Marmalade’: Bright chartreuse foliage.

Final Thoughts

Creating a beautiful shade garden is all about selecting the right plants that thrive in lower light conditions. Hosta’s, astilbes, ferns, and heucheras are some of the best choices, offering a mix of textures, colors, and heights to add interest and beauty to your garden. By understanding their needs and providing the right care, you can transform even the shadiest corners of your garden into a lush, vibrant oasis. Happy planting!

5 Tricks to Make Zinnias Healthy, Bushier, and Flowerful

Welcome to the world of vibrant blooms and lush greenery! Zinnias are a favorite among gardeners for their dazzling colors, long-lasting flowers, and ease of care. Whether you’re a seasoned gardener or a beginner, these five tricks will help you cultivate zinnias that are healthy, bushier, and brimming with flowers. Let’s dive in!

1. Choose the Right Location

Zinnias thrive in full sunlight, needing at least 6-8 hours of direct sunlight daily. Choose a spot in your garden that receives plenty of sunlight. These sun-loving plants will reward you with abundant blooms and healthy growth when given the right amount of light.

  • Tip: Avoid shady areas as zinnias may become leggy and produce fewer flowers.

2. Soil Preparation and Fertilization

Zinnias prefer well-drained, fertile soil with a pH level of 5.5 to 7.0. Before planting, enrich your soil with organic matter such as compost or aged manure to improve soil structure and nutrient content.

  • Tip: Use a balanced, slow-release fertilizer to provide steady nourishment. Over-fertilizing can lead to excessive foliage at the expense of blooms.

3. Proper Watering Techniques

Consistent watering is crucial for zinnias, especially during dry spells. Water your zinnias deeply and thoroughly, ensuring the soil remains moist but not waterlogged.

  • Tip: Water at the base of the plants to keep the foliage dry and prevent diseases like powdery mildew. Mulching around the plants can help retain soil moisture and reduce weed growth.

4. Pinching and Pruning

To encourage bushier growth and more flowers, pinch back the tips of young zinnia plants when they are about 6 inches tall. This process, known as pinching, stimulates the plant to produce more branches.

  • Tip: Regularly deadhead spent flowers by cutting the stem back to the nearest set of leaves. This promotes continuous blooming and keeps your zinnias looking tidy.

5. Pest and Disease Management

Zinnias are relatively hardy, but they can still fall victim to pests and diseases. Keep an eye out for common issues like aphids, spider mites, and powdery mildew.

  • Tip: Inspect your plants regularly and use organic insecticidal soap or neem oil to manage pests. Ensure good air circulation by spacing plants appropriately and watering at the base to minimize humidity around the foliage.

Conclusion

With these five tricks, you’ll be well on your way to growing zinnias that are not only healthy and bushier but also adorned with an abundance of vibrant flowers. Happy gardening!

Stay tuned for more gardening tips and tricks. Share your zinnia-growing experiences in the comments below – we’d love to hear from you!

4 Houseplants for a Healthier Home

Creating a green oasis within your home is more than just a trend—it’s a lifestyle choice that can improve your well-being. Houseplants not only beautify your space but also offer numerous health benefits, particularly in your home or bedroom. Today, we’ll explore four fantastic houseplants that can transform your living space into a serene and healthy haven.

1. Snake Plant (Sansevieria trifasciata)

Also known as Mother-in-Law’s Tongue, the Snake Plant is a striking addition to any room. Its tall, sword-like leaves are not just visually appealing but also highly efficient air purifiers.

Benefits:

  • Air Purification: NASA’s Clean Air Study revealed that Snake Plants filter out toxins like formaldehyde, xylene, toluene, and nitrogen oxides, improving indoor air quality.
  • Oxygen Production: Uniquely, they release oxygen at night, making them perfect for bedrooms. Increased oxygen can lead to better sleep quality.
  • Low Maintenance: They thrive in low light and require minimal watering, ideal for busy lifestyles or those new to houseplants.

Care Tips:

  • Place in indirect light.
  • Water sparingly, allowing soil to dry out between waterings.
  • Dust leaves occasionally to keep them clean and efficient.

2. Spider Plant (Chlorophytum comosum)

The Spider Plant is a classic houseplant known for its spider-like offshoots, or “pups,” that dangle down from the mother plant. It’s easy to care for and incredibly resilient.

Benefits:

  • Air Purification: Spider Plants are champions at removing harmful substances like carbon monoxide, formaldehyde, and xylene.
  • Humidity Booster: They help increase indoor humidity, which can relieve respiratory issues and skin dryness.
  • Pet-Friendly: Non-toxic to pets, making them a safe choice for households with furry friends.

Care Tips:

  • Bright, indirect sunlight is best.
  • Keep soil slightly moist; water more in summer and less in winter.
  • Trim off dead tips to encourage new growth.

3. Aloe Vera (Aloe barbadensis miller)

Aloe Vera is not only a trendy plant but also a medicinal powerhouse. Known for its thick, fleshy leaves filled with soothing gel, it’s a must-have for natural health enthusiasts.

Benefits:

  • Air Quality: Aloe Vera helps clear the air of formaldehyde and benzene, common byproducts of chemical-based cleaners and paints.
  • Healing Properties: The gel inside its leaves can be used to treat burns, cuts, and skin irritations.
  • Mood Booster: Its green, spiky leaves can enhance mood and reduce stress levels by bringing a touch of nature indoors.

Care Tips:

  • Needs bright, indirect sunlight.
  • Water deeply but infrequently; allow soil to dry out completely between waterings.
  • Use well-draining soil to prevent root rot.

4. Lavender (Lavandula)

Lavender is famous for its lovely fragrance and calming properties. While it’s more commonly grown outdoors, certain varieties can thrive indoors with the right care.

Benefits:

  • Sleep Aid: The soothing scent of lavender can help reduce anxiety and improve sleep quality.
  • Natural Deodorizer: Acts as a natural air freshener, filling your room with a pleasant aroma.
  • Stress Relief: Its presence has been shown to lower heart rate and blood pressure, promoting a sense of calm.

Care Tips:

  • Requires lots of sunlight; place in a south-facing window.
  • Water when the soil feels dry to the touch.
  • Prune regularly to maintain shape and encourage growth.

Final Thoughts

Incorporating these houseplants into your home or bedroom can significantly enhance your living environment. Not only do they purify the air and add aesthetic appeal, but they also contribute to your physical and mental well-being. So, go ahead, bring a bit of the outdoors inside and enjoy the myriad benefits that these green companions have to offer. Happy planting! 🌿

Crafting a Small Herb Wreath for Your Kitchen: A Step-by-Step Guide

f you love cooking with fresh herbs and appreciate a touch of natural decor, a small herb wreath for your kitchen is the perfect project. Not only does it bring a delightful aroma, but it also offers an aesthetically pleasing way to access your favorite herbs. Follow this guide to create a beautiful and functional herb wreath.

Materials You’ll Need:

  • Herb sprigs: Choose a variety of your favorite culinary herbs such as rosemary, thyme, sage, oregano, and bay leaves.
  • A small wreath frame: You can use a metal or wooden frame, or even make one from a flexible vine.
  • Floral wire: Thin wire to secure the herbs to the frame.
  • Ribbon or twine: For hanging the wreath.
  • Scissors: For trimming the herbs and wire.
  • Optional decorations: Dried flowers, small garlic bulbs, or chili peppers for added color and texture.

Step-by-Step Instructions:

1. Prepare Your Herbs

Start by cutting your herbs into manageable sprigs, about 5-6 inches long. Wash them gently and pat them dry with a paper towel. If you prefer, you can let them air dry for a bit, but don’t let them dry out completely as fresh herbs are easier to work with.

2. Arrange the Base Layer

Begin by selecting a few sprigs of your primary herb, like rosemary or thyme, which will form the base layer of your wreath. Place the sprigs along the wreath frame, overlapping them slightly to cover the frame completely. Secure each sprig to the frame using small pieces of floral wire, wrapping the wire tightly around both the herb and the frame.

3. Add More Layers

Once your base layer is secure, start adding other herbs. Mix different textures and colors to create visual interest. Continue overlapping the herbs and securing them with floral wire. Make sure to cover any visible wire from previous layers to keep the wreath looking natural and lush.

4. Incorporate Optional Decorations

If you’re adding decorative elements like dried flowers, small garlic bulbs, or chili peppers, now is the time to attach them. Use floral wire to secure these items, tucking the ends of the wire into the foliage to hide them.

5. Trim and Tidy

Once you’ve attached all your herbs and decorations, take a moment to trim any excessively long stems or stray leaves to give your wreath a tidy, uniform appearance.

6. Attach the Hanging Ribbon

Cut a length of ribbon or twine and loop it around the top of the wreath frame. Tie a secure knot and then create a loop for hanging. Ensure the loop is strong enough to hold the wreath’s weight.

7. Hang Your Wreath

Find a suitable spot in your kitchen to hang your herb wreath. It could be on a wall, a cabinet door, or even from a hook near your cooking area. Ensure it’s within easy reach so you can snip off fresh herbs as needed.

Tips for Maintaining Your Herb Wreath

  • Regular Trimming: Regularly snip herbs from your wreath to encourage fresh growth and prevent them from drying out too quickly.
  • Hydration: Mist the wreath lightly with water every few days to keep the herbs fresh.
  • Avoid Direct Sunlight: Hang your wreath away from direct sunlight and heat sources to prolong its freshness.

Creating a small herb wreath is a rewarding project that combines functionality with beauty. It not only enhances your kitchen’s décor but also provides a convenient source of fresh herbs to elevate your culinary creations. Enjoy the process and the wonderful aromas that will fill your kitchen!

Home is Where the Boat Is

Potting, Puttering & Pontooning

Cats and Trails and Garden Tales

Musings on cats, travel, gardens and life

Leaf And Twig

Where observation and imagination meet nature in poetry.

phillipsplace

A new beginning, mobile home living, adding our style inside and out.

Ruth E. Hendricks

Daily Journal of Life in Pittsburgh

The Haute Mommy Handbook

Motherhood Misadventures + Creative Living

Suzanne's Mom's Blog

Arts, Nature, Good Works, Luna & Stella Lockets & Birthstones

𝑻𝒐𝒓𝒏𝒂𝒅𝒐 𝑶𝒇 𝑪𝒉𝒂𝒐𝒔 🌪

Thoughts, experiences and learnings in a turbulent time

Sarah Rajkotwala - Author & Spiritual Teacher blog

Gardening Fairies Flowers Spirituality Angels Love Joy

Ideas and Advice for How To Live a Joyful and Empowered Life.

All Things Empowering - Healing Ourselves & Earth, Self-Sufficiency, Food Forests, Gardening, Art, Road Trips, Preserving, Foraging, Permaculture, Homesteading and More!

AmericaOnCoffee

We’re just inviting you to take a timeout into the rhythmic ambiance of our breakfast, brunch and/or coffee selections. We are happy whenever you stop by.

Heart to Hearth Cookery

Sharing my Experimental Archaeology of Food

The Herb Society of America Blog

Learn • Explore • Grow