
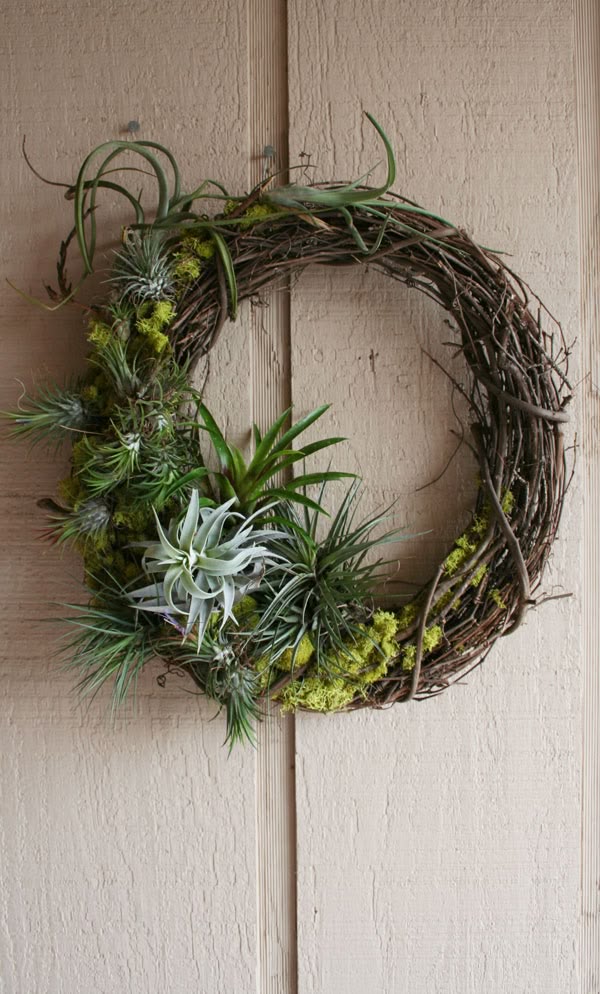
Bring Natural Beauty to Your Front Door with Moss & Tillandsias
One of my favorite ways to decorate with air plants is by creating a living wreath. Unlike traditional wreaths that fade after a season, this natural grapevine wreath can be enjoyed for years with just a little care. Air plants (Tillandsia) don’t require soil, making them the perfect choice for creating a lightweight, eye-catching piece of living art.
The wreath pictured above uses a rustic grapevine base, preserved moss, and a variety of air plants that create texture, movement, and color. Here’s how you can make one yourself!
Supplies You’ll Need
- 16–18 inch grapevine wreath
- Assorted live air plants (8–12 plants)
- Preserved sheet moss or reindeer moss
- Floral wire (22–26 gauge)
- Green floral pins (optional)
- Fishing line or jute twine
- Hot glue gun (for moss only—not for attaching the air plants)
- Wire cutters
- Spray bottle filled with water
- The Best Air Plants for This Wreath
Using several different species creates the layered, natural look that makes this wreath so stunning.
1. Tillandsia xerographica
The showstopper!
Place one large Xerographica near the lower left side of the wreath. Its wide silver leaves become the focal point.
Why it works
Elegant rosette shape
Drought tolerant
Beautiful silver color
Long-lasting
2. Tillandsia capitata Peach or Green
These provide a fuller appearance with graceful curved leaves.
Place two or three throughout the center grouping.
3. Tillandsia ionantha
These tiny plants tuck perfectly into small openings.
Their compact size helps fill empty spaces, and many blush bright red before blooming.
4. Tillandsia stricta
Adds texture with its dense, upright leaves.
Great for filling middle sections.
Tillandsia bulbosa or caput-medusae
Their twisting, whimsical leaves add lots of personality.
Use one near the top for a dramatic cascading effect.
Step 1: Prepare the Wreath
Lay the grapevine wreath flat on a table.
Decide which section will hold your plants. This design looks best when about one-third of the wreath is decorated while the remaining grapevine stays exposed.
This asymmetrical style gives the wreath a modern botanical feel.
Step 2: Add the Moss
Using small amounts of hot glue, secure preserved moss into the grapevine.
The moss creates a soft woodland appearance while hiding floral wire.
Don’t cover the entire wreath—leave plenty of grapevine visible.
Step 3: Arrange Your Air Plants
Before attaching anything, simply set each air plant on the wreath.
Start with the largest plant first.
Arrange medium-sized plants around it.
Finish with the smallest air plants tucked into gaps.
Step back several times to make sure the arrangement feels balanced.
Step 4: Secure the Plants
Never glue air plants directly.
Instead:
- Wrap thin floral wire gently around the base of each plant.
- Thread the wire through the grapevine.
- Twist the wire behind the wreath until snug.
- Hide the wire beneath the moss.
Fishing line also works wonderfully because it becomes nearly invisible.
Step 5: Add Finishing Touches
Tuck additional moss around the plants.
Allow several air plants to extend slightly beyond the wreath edge to create a more natural, flowing appearance.
Avoid making everything perfectly symmetrical—the organic look is part of the charm.
Caring for Your Living Wreath
Because these are live plants, they’ll appreciate a little attention.
Watering
Once each week:
- Remove the wreath from the wall.
- Soak the air plant portion in room-temperature water for 20–30 minutes.
- Shake away excess water.
- Allow the wreath to dry upside down for several hours before rehanging.
During hot summer weather or in very dry homes, lightly mist the plants between soakings if needed.
Light
Hang your wreath in:
- Bright, indirect light
- A covered porch
- A shaded patio
- Near a sunny window indoors
Avoid intense afternoon sun, which may scorch the leaves.
Post comments if you like this fun DIY project!

