If you’re looking for a truly stunning plant that rewards patience with breathtaking blooms, the Orchid Cactus is a must-have. Known for its large, exotic flowers that resemble orchids, this tropical cactus is a showstopper in any indoor garden or greenhouse. Though it might look high-maintenance, it’s actually easy to grow once you understand its needs.
🌿 What Is an Orchid Cactus?
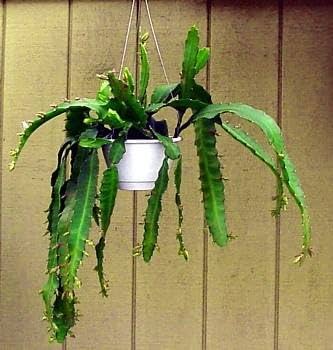
The Orchid Cactus (Epiphyllum) is a tropical cactus native to Central and South American rainforests. Unlike desert cacti, it grows on trees (epiphytic) and thrives in filtered light and humidity. Its long, flat, leaf-like stems can trail beautifully from hanging pots or baskets, making it an ideal plant for dramatic indoor displays.
🌱 How to Grow an Orchid Cactus
1. Choose the Right Pot & Soil
- Select a pot with good drainage. Orchid cacti dislike soggy roots.
- Use a well-draining mix — one part orchid bark, one part perlite, and one part cactus soil works perfectly.
- Avoid compact soils; their roots need airflow and moisture balance.
2. Light Requirements
- Bright, indirect sunlight is best. Too much direct sun can scorch the stems, while too little light may prevent blooming.
- An east or north-facing window is ideal.
3. Watering Routine
- Water when the top inch of soil feels dry.
- During active growth (spring and summer), keep soil lightly moist — not soggy.
- In fall and winter, reduce watering to allow a rest period.
4. Temperature & Humidity
- Prefers temperatures between 60–75°F (15–24°C).
- Likes moderate humidity — a pebble tray or humidifier can help if indoor air is dry.
🌼 How to Make Your Orchid Cactus Bloom
The true magic of an orchid cactus is in its blooming season, typically in late spring to summer. The flowers are short-lived but absolutely breathtaking.
Blooming Tips:
- Provide Bright Indirect Light: Too little light is the top reason orchid cacti don’t bloom.
- Feed During Growth: Use a balanced, diluted fertilizer (10-10-10 or orchid fertilizer) every 2–4 weeks in spring and summer.
- Give It a Cool Rest: In winter, let the plant rest in a cooler room (around 50–60°F) with less water and no fertilizer. This rest period encourages bud formation.
- Don’t Move It Once Buds Form: Moving or rotating the plant can cause buds to drop before they open.
🌱 Propagation: How to Grow New Plants
Orchid cacti are easy to propagate from stem cuttings.
Steps:
- Cut a healthy, 6-inch stem segment with clean shears.
- Let the cutting dry for a few days so the cut end calluses over.
- Plant the cutting in a small pot with a slightly damp cactus or orchid mix.
- Keep it in bright, indirect light and mist occasionally to maintain humidity.
- Roots should form within 4–6 weeks. Once established, treat it like a mature plant.
🌸 Common Orchid Cactus Care Tips
- Prune after flowering to encourage new growth and shape the plant.
- Avoid overwatering — this is the most common issue.
- Support long stems with a trellis or let them trail naturally for a cascading effect.
- Re-pot every 2–3 years to refresh soil and promote healthy growth.
In conclusion, the Orchid Cactus may seem exotic, but it’s surprisingly easy to care for once you understand its rhythm. With the right balance of light, moisture, and rest, you’ll be rewarded with stunning, fragrant blooms that make every effort worthwhile.
Whether you’re a houseplant enthusiast or just starting out, this tropical beauty adds an unforgettable touch of the rainforest to your home.