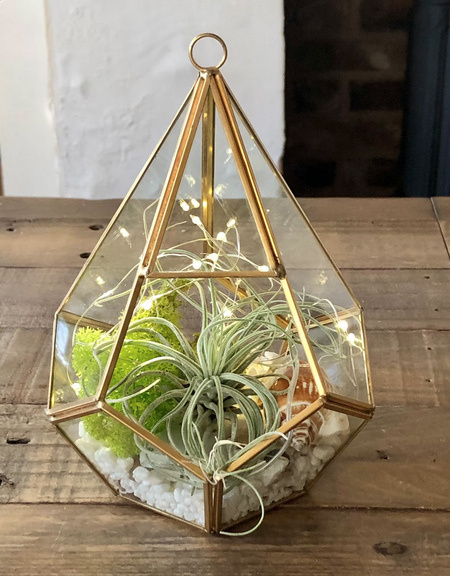
Building a Fall & Winter Compost – Soil Gold for Spring

Composting doesn’t take a break when the weather cools—it just slows down a bit. And that’s okay. What you start now becomes the foundation of your spring garden.

Easy Steps:

  1. Start with Browns: Dry leaves, shredded paper, straw.
  2. Add Greens: Fruit peels, veggie scraps, coffee grounds.
  3. Mix and Moisture: Keep it damp as a wrung-out sponge.
  4. Turn Occasionally: Even in winter, give it a stir every couple of weeks.

If you’re short on space, use a sealed bin or tumbler. Come spring, you’ll have rich, crumbly compost ready to feed your beds—nature’s way of saying “good work.”

🍂 Where to Place Your Compost Pile in Fall & Winter

Choosing the right spot makes a huge difference once cold nights settle in.

1. Pick a Sunny Location

Even in winter, sunlight adds warmth.
A sunny patch helps keep the internal temperature higher, which keeps microbes awake and active. Avoid deep-shade corners where frost lingers.

2. Place It Near a Windbreak

Cold wind strips heat fast.
Position your compost near:

  • A fence
  • A shed
  • A garage wall
  • A row of shrubs

This reduces exposure and helps the pile hold warmth.

3. Keep It Close to a Water Source

Winter air is surprisingly dry. Your compost may need a splash of water on warmer days.
Having it near a hose or rain barrel makes it easier to maintain.

4. Use the Earth as Insulation

Skip raised platforms this time of year. Place the pile directly on soil so worms and beneficial microbes can slip inside for shelter and help keep decomposition going.

5. If Using a Bin, Tuck It Into a “Cozy Corner”

Back corners of the yard that get morning sun and some afternoon shade are ideal.
Bonus points if you can place it near trees—fallen leaves are compost gold.


🔥 How to Keep Your Compost Working in Winter

When temperatures drop, your compost slows down, but it doesn’t stop as long as you help it along.

1. Build It BIG

A larger pile stays warmer.
Aim for at least 3 ft. x 3 ft. x 3 ft.
The bigger the mass, the more internal heat it holds.

2. Add Plenty of Browns Now

Winter = fewer green scraps and more “browns” available outdoors.
Load up on:

  • Dry leaves
  • Straw
  • Shredded cardboard
  • Mulched pine needles

These insulate the pile and keep it fluffy so air can circulate.

3. Chop and Shred What You Can

Smaller pieces = faster breakdown.
During winter, this is a lifesaver, because the microbes are already working in slow motion.

4. Keep It Moist — But Not Wet

Check moisture every two weeks.

  • If it feels like a dry sponge, lightly water it on a mild day.
  • If it’s soggy, mix in dry leaves or shredded paper.

Frozen compost = okay. Waterlogged compost = bad.

5. Turn It Less Often

In winter, you don’t want to let too much heat escape.
Turn the pile only once every 4–6 weeks, and do it midday when temperatures peak.

6. Cover the Pile

Covering = warmth + moisture control.
Use:

  • A tarp
  • Old carpet scraps
  • A compost lid (if using a bin)

This traps heat and prevents rain or snow from flooding the pile.

7. Add Kitchen Scraps Smartly

When you add fresh greens in winter:

  • Dig a small hole in the center of the pile
  • Add scraps
  • Cover and pat it down

The center stays the warmest and decomposes scraps best.

8. Insulate with Extra Leaves

Surround the pile with bags of fallen leaves like a little “leaf fortress.”
It protects the compost and gives you extra browns to use through the season.

🌿 Closing Thought

As winter settles in and your compost quietly transforms into nutrient-rich gold, you’ll be setting the stage for your strongest spring yet. And when those warm days finally roll back around, you’ll have everything ready to wake up your garden—rich soil, healthy roots, and plants that burst with life. If you’re already dreaming about spring, check out the seasonal goodies in my Etsy shop. Many of my planters and garden gifts pair perfectly with fresh compost and new seedlings, and they make planting season feel even more special. Happy winter composting, friends—spring is closer than it feels.

🌵 The Christmas Cactus – Getting It to Bloom (and Telling Its Cousins Apart)

If there’s one plant that earns its spot on the holiday table year after year, it’s the Christmas cactus. Those arching stems and vivid blooms show up right when most plants are resting — a welcome burst of color in the heart of winter. But here’s a fun truth: the “Christmas cactus” often sold in stores might actually be a Thanksgiving cactus in disguise. Their care is similar, but their personalities and bloom times differ just enough to matter.


🌿 Meet the Holiday Cactus Trio

1. The Christmas Cactus (Schlumbergera x buckleyi)

  • Bloom time: Late December to early January
  • Stem edges: Smooth and rounded
  • Flower shape: Gently drooping, tubular blooms — often in pink, red, or white
  • Growth habit: Graceful, with arching stems that spill elegantly from hanging pots
  • Personality: The calm one of the bunch — blooms a little later, grows a bit slower, but always delivers when the lights are twinkling

The true Christmas cactus is the classic holiday heirloom — often passed down from grandparents’ windowsills. It prefers bright, indirect light and cooler nights around 55–60°F to trigger buds.

2. The Thanksgiving Cactus (Schlumbergera truncata)

  • Bloom time: Late November to early December
  • Stem edges: Pointed, claw-like tips (like tiny pincers)
  • Flower shape: Upright and slightly more flared than the Christmas cactus
  • Growth habit: Sturdier, with more upright segments

This one tends to be mislabeled in stores as a Christmas cactus, but it’s just a few weeks early to the party. Still, it’s just as beautiful — and a bit more forgiving when it comes to temperature changes.

3. The Easter Cactus (Rhipsalidopsis gaertneri)

  • Bloom time: March to April
  • Stem edges: Rounded but with small bristles at the tips
  • Flower shape: Star-shaped blooms that open fully in daylight
  • Growth habit: More compact and symmetrical

This cousin prefers slightly cooler, drier winter rest before it explodes into vivid orange, pink, or red flowers come spring. It’s a lovely way to carry the cactus family’s rhythm through the whole year — Thanksgiving, Christmas, and Easter alike.


🌸 How to Encourage Blooming (for All Three)

The trick is understanding their natural cycles:

  • Light: They need at least 12–14 hours of darkness each night for 6–8 weeks to form buds. A dark room or covered area at night works wonders.
  • Temperature: Keep them around 55–60°F at night during the budding phase.
  • Water: Reduce watering slightly until buds form, then keep soil just barely moist — not soggy.
  • Movement: Once buds appear, avoid shifting the pot too often. They can drop buds when startled by light or temperature changes.

When cared for properly, they’ll reward you with a dazzling show that lasts for weeks. And with the right touch, you can cycle blooms through the year — Thanksgiving, Christmas, and Easter — with these three cheerful cousins.


🌱 Final Thought

Holiday cacti aren’t just seasonal décor; they’re little pieces of family tradition and patience. Whether yours blooms for Thanksgiving or Christmas (or surprises you in April), it’s a sign of balance — a plant that thrives when given rest, gentle light, and a little attention.

Rosemary for the Holidays – From Kitchen Windowsill to Homemade Potpourri

There’s something timeless about rosemary this time of year. Maybe it’s the way its piney scent fills the kitchen when the world outside turns cold. If you’ve got a rosemary plant, treat it like the little evergreen friend it is.

Winter Care Tips:

  • Keep it where it can soak up 6-8 hours of sunlight a day—south-facing windows are gold.
  • Let the soil dry slightly between watering. Rosemary hates wet feet in winter.
  • Give it good airflow to prevent powdery mildew—no stuffy corners.

Creative Use:
Harvest a few sprigs, dry them, and mix with cinnamon sticks, orange peels, and a handful of cloves for a homemade potpourri. The scent will bring a warm, woodsy note to your home, a little reminder of summer hiding in winter’s chill. Below is a holiday potpourri recipe that I create to sell locally.

Ingredients 

  • ▢1 cup cranberries, fresh preferred but frozen are fine
  • ▢1 large orange, sliced thin
  • ▢1 large lemon, sliced thin
  • ▢4 to 5 cinnamon sticks, 1 to 2 tablespoons ground cinnamon may be substituted
  • ▢1 tablespoon whole cloves, 1 to 2 teaspoons ground cloves may be substituted
  • ▢2 to 3 fresh rosemary sprigs, 1 teaspoon dried rosemary may be substituted
  • ▢1 tablespoon vanilla extract, using essential oils is also an idea here
  • ▢2 cups water

Instructions

stovetop cooking – Add all ingredients to the pot, cover with water, bring to a boil uncovered over high heat, and once boiling, reduce the heat to low so that it just barely simmers enough to create steam which is what creates the aroma. Tips – Make sure to remember to turn off your stove if you’re leaving the house. I also like to place this on a back burner that’s far from anyone’s hands who may be in and out of the kitchen since it’ll be there for hours. If the water level drops, add additional water, as needed.

Let me know in the comments if you make your own holiday potpourri

Bring Fresh Flavor Home This Holiday Season with the Culinary Herb Kitchen Kit

There’s something special about cooking during the holidays — the aroma of roasted herbs, simmering soups, and homemade sauces fills the kitchen with warmth and comfort. This year, why not make your holiday dishes even more flavorful and fresh with your very own Culinary Herb Kitchen Kit — now available in my Etsy shop!

Whether you’re a seasoned cook or just starting your gardening journey, this all-in-one kit makes it easy to grow a variety of delicious herbs right from your kitchen windowsill. It’s also a wonderful gift idea for foodies, gardeners, or anyone who loves adding a fresh touch to their meals.

🌿 What’s Inside the Culinary Herb Kitchen Kit

Each kit comes with 8 premium herb seed packets, carefully chosen to bring a burst of flavor to every dish you create:

  • Basil – Perfect for pesto, pasta, and salads.
  • Cilantro – A fresh favorite for salsas, curries, and garnishes.
  • Parsley – Great for soups, sauces, and everyday seasoning.
  • Thyme – Ideal for roasted meats, veggies, and marinades.
  • Oregano – A must-have for pizza, pasta, and Italian dishes.
  • Chives – Adds a mild onion flavor to just about anything.
  • Sage – Classic for stuffing, stews, casseroles, and savory meats.
  • Dill – Excellent for pickling, seafood, and creamy dressings.

Along with the seeds, the kit includes everything you need to get started:

✔ A Seed Starter Tray with Cover to create the perfect growing environment.
✔ A Durable Seed Packet Container to keep your seeds fresh and organized.
✔ An Easy Planting Guide Card with a direct link to step-by-step instructions to help you grow your herb garden successfully.

🌱 Perfect for Holiday Gifting

The Culinary Herb Kitchen Kit isn’t just a gardening starter — it’s a gift that keeps on giving. Imagine gifting a loved one the joy of snipping fresh basil for homemade pizza or adding homegrown thyme to roasted vegetables. It’s a thoughtful, hands-on gift that combines creativity, sustainability, and flavor.

🍴 Add Fresh Flavor to Every Meal

Fresh herbs elevate even the simplest dishes. With this kit, you can harvest your herbs right when you need them — no more last-minute grocery runs or wilted bunches in the fridge. Grow them in your kitchen year-round for fresh, vibrant flavor every time you cook.

Make your holiday season more flavorful and memorable with the Culinary Herb Kitchen Kit, now available at Printhousedesign on Etsy. Bring the garden indoors and add a touch of green — and a lot of flavor — to your kitchen!

🌙🌿 Nighttime Garden Visitors? Here’s How to Keep Them Away!

If you’ve ever woken up to find your flower beds trampled or your favorite plants nibbled down to stubs, you’re not alone. Deer, rabbits, raccoons, and other nighttime visitors can wreak havoc on even the most well-tended garden. While these creatures are just looking for a midnight snack, there are effective and humane ways to deter them from turning your yard into their buffet. Here are three tried-and-true methods to protect your garden and help keep wildlife at a respectful distance.


1. Use Scents They Can’t Stand

Deer and many other critters have a strong sense of smell, which you can use to your advantage. Certain scents are unappealing or even alarming to them. Try these natural repellents:

  • Plant deterrent herbs like lavender, rosemary, or mint along the garden’s border. The strong fragrance can mask the appealing smell of your veggies or flowers.
  • DIY spray: Mix water with a few drops of peppermint, garlic, or clove essential oil and mist it around your garden perimeter.
  • Commercial repellents: These often use ingredients like egg solids or predator urine (yes, really!) to create a scent that warns animals to stay away.

Reapply these repellents every few days or after rain for the best results.


2. Add Motion and Light

Animals that roam your yard at night rely on darkness and quiet to stay hidden. Motion-activated devices can startle them and make them think twice about coming back.

  • Motion-activated sprinklers: A sudden burst of water is harmless but startling enough to send most deer or raccoons running.
  • Solar lights or motion lights: Strategically placed lights that flick on when movement is detected can make your garden feel less like a safe haven for nighttime wanderers.
  • Wind chimes or reflective décor: Shiny pinwheels, aluminum foil strips, or old CDs can reflect light and create movement that deters curious animals.

3. Physical Barriers and Smart Planting

Sometimes, the best solution is a good defense.

  • Fencing: A sturdy fence—ideally 7 to 8 feet tall—can keep deer out, while smaller mesh fencing can protect against rabbits and ground-dwellers.
  • Raised beds: Elevating your garden makes it harder for animals to reach your plants and easier for you to protect them.
  • Plant wisely: Choose a few deer-resistant plants like foxglove, yarrow, or daffodils to line your garden edges. These aren’t appealing snacks and can act as a natural deterrent barrier.

Final Thoughts

Wildlife is a beautiful part of nature, but your garden deserves to thrive without nightly disturbances. Combining scent deterrents, motion-based tools, and smart barriers can make a big difference in keeping your flowers and vegetables safe. With a little planning and persistence, you can enjoy your garden in peace—without uninvited nighttime guests sneaking in for a late dinner.

Home is Where the Boat Is

Potting, Puttering & Pontooning

Cats and Trails and Garden Tales

Musings on cats, travel, gardens and life

Leaf And Twig

Where observation and imagination meet nature in poetry.

phillipsplace

A new beginning, mobile home living, adding our style inside and out.

Ruth E. Hendricks

Daily Journal of Life in Pittsburgh

The Haute Mommy Handbook

Motherhood Misadventures + Creative Living

Suzanne's Mom's Blog

Arts, Nature, Good Works, Luna & Stella Lockets & Birthstones

𝑻𝒐𝒓𝒏𝒂𝒅𝒐 𝑶𝒇 𝑪𝒉𝒂𝒐𝒔 🌪

Thoughts, experiences and learnings in a turbulent time

Sarah Rajkotwala - Author & Spiritual Teacher blog

Gardening Fairies Flowers Spirituality Angels Love Joy

Ideas and Advice for How To Live a Joyful and Empowered Life.

All Things Empowering - Healing Ourselves & Earth, Self-Sufficiency, Food Forests, Gardening, Art, Road Trips, Preserving, Foraging, Permaculture, Homesteading and More!

AmericaOnCoffee

We’re just inviting you to take a timeout into the rhythmic ambiance of our breakfast, brunch and/or coffee selections. We are happy whenever you stop by.

Heart to Hearth Cookery

Sharing my Experimental Archaeology of Food

The Herb Society of America Blog

Learn • Explore • Grow