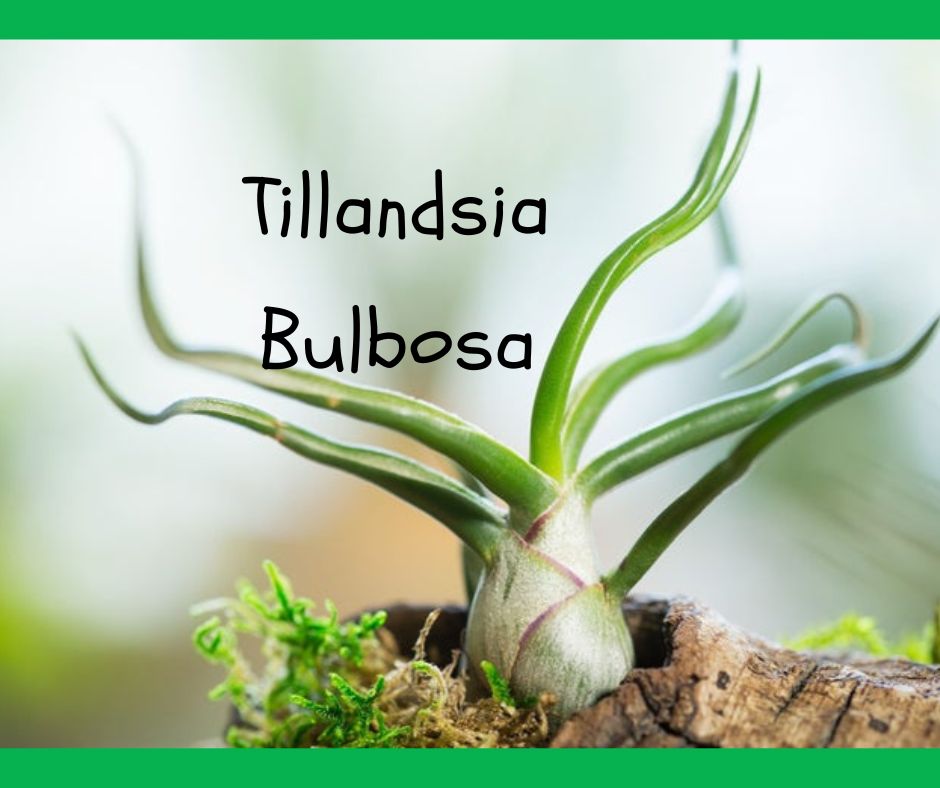
DIY Bee Water Station

Creating a bee water station is a wonderful way to help bees stay hydrated, especially during hot weather. Here’s a step-by-step guide to making one using a bottom terracotta planter dish, pebbles, and water:

Materials Needed:

  1. Terracotta planter dish (shallow)
  2. Pebbles or small stones
  3. Water

Instructions:

  1. Choose a Location:
    • Find a suitable location for your bee water station. It should be in a place where bees are active, preferably near flowering plants, but away from high-traffic areas for humans and pets.
  2. Prepare the Terracotta Dish:
    • Clean the terracotta dish thoroughly to remove any dirt or debris. A quick rinse with water should suffice.
  3. Add Pebbles:
    • Place a layer of pebbles or small stones in the terracotta dish. The pebbles should be enough to cover the bottom of the dish, but not too high. Aim for a single layer that leaves enough space for water to pool between the stones.
  4. Add Water:
    • Pour water into the dish, making sure the water level is just below the tops of the pebbles. This ensures that the bees can land on the pebbles and drink safely without the risk of drowning.
  5. Place the Water Station:
    • Set the dish in your chosen location. Make sure it’s on a stable surface so it doesn’t tip over easily.
  6. Maintain the Water Station:
    • Check the water station daily to ensure there’s enough water. Refill as needed, and clean the dish and pebbles periodically to prevent algae build-up and keep the water fresh.

Tips:

  • Shade: Place the water station in a spot that gets partial shade to keep the water from evaporating too quickly.
  • Attract Bees: Plant bee-friendly flowers nearby to attract more bees to the water station.
  • Clean Water: Use fresh, clean water to keep the bees healthy and happy.

This simple and effective bee water station can make a big difference for local bees, helping them stay hydrated and thrive in your garden.

Follow the link and save the video :https://pin.it/79To1Z0Kn

DIY Harry Potter Mandrake Craft

DIY mandrake Harry Potter craft will be the hit of the party! This kid-friendly craft is easy to make and any Harry Potter fan will love sculpting their own baby mandrakes.Β A mandrake is a magical and sentient plant which has a root that looks like a human (like a baby when the plant is young, but maturing as the plant grows). When matured, its cry can be fatal to any person who hears it. The kids loved sculpting with air dry clay. The nice thing about this clay is that it’s soft and pliable, making it easy to sculpt with. It also doesn’t require baking, just simply leave out overnight to dry. Our local library hosted a Harry Potter Birthday bash and I loved working with the kids on creating this fun craft.

Here are the supplies that you need to create your own mandrake. You can find everything on Amazon or at your local craft store. A 2.5lb tub of Crayola Air Dry Clay will make 4 mandrakes. Toothpicks and plastic knives can be used for sculpting mandrake faces.

In order to create your very own Mandrake, start by rolling the air dry clay into an oval shape with two arms coming off the body. Place the clay in the terra cotta pot. Twist the top to make it into a pointed shape, as shown in the photos below. Use a toothpick or plastic knife to create a face. There’s really no wrong way to create your own mandrake. Place a few faux leaves in the clay and allow to dry overnight. Get your hands dirty and have some sculpting fun!

Next time you are in a crafty moment, try making one of these!

How to Repel Gnats for House Plants and Yourself When Working in the Outdoor Garden

Gnats can be a nuisance, whether they’re invading your indoor plants or bothering you in your outdoor garden. These tiny pests can be persistent, but with the right strategies, you can effectively keep them at bay. Here’s a comprehensive guide to help you repel gnats from your house plants and yourself when working outdoors.

Repelling Gnats from House Plants

  1. Maintain Proper Soil Moisture
    • Gnats thrive in moist environments. Overwatering your plants can create ideal conditions for them. Allow the top inch of soil to dry out between waterings to deter gnat larvae.
  2. Use Well-Draining Soil
    • Ensure your plants are in well-draining soil. Poor drainage leads to waterlogged conditions, attracting gnats. Adding sand or perlite to the soil mix can improve drainage.
  3. Employ Sticky Traps
    • Yellow sticky traps are effective at catching adult gnats. Place these traps near the soil surface to capture gnats as they emerge.
  4. Apply Natural Deterrents
    • Sprinkle diatomaceous earth on the soil surface. This natural powder is abrasive to gnats and other pests but safe for plants.
    • Use neem oil spray. Neem oil is a natural insecticide that can disrupt the life cycle of gnats. Dilute it according to the instructions and spray it on the soil and plant leaves.
  5. Introduce Beneficial Nematodes
    • Beneficial nematodes are microscopic worms that prey on gnat larvae in the soil. They are safe for plants and can significantly reduce gnat populations.
  6. Keep the Environment Clean
    • Remove fallen leaves and plant debris from the soil surface. Decaying organic matter can attract gnats.

Repelling Gnats in the Outdoor Garden

  1. Wear Protective Clothing
    • Long sleeves, pants, and hats can help protect your skin from gnat bites. Light-colored clothing is less attractive to gnats.
  2. Use Natural Repellents
    • Essential oils like eucalyptus, lavender, citronella, and peppermint are effective gnat repellents. Mix a few drops with water in a spray bottle and apply it to your skin and clothing.
  3. Create a Gnat-Free Zone
    • Set up fans in your garden seating areas. Gnats are weak fliers and can be deterred by a steady breeze.
  4. Avoid Peak Gnat Activity Times
    • Gnats are most active during dawn and dusk. Plan your gardening activities for times when gnats are less active.
  5. Keep the Area Dry
    • Remove standing water from your garden. Gnats breed in stagnant water, so eliminating these breeding grounds is crucial.
  6. Grow Gnat-Repelling Plants
    • Some plants, like marigolds, basil, and rosemary, can naturally repel gnats. Plant these around your garden to create a gnat-deterrent barrier.

Additional Tips for Both Indoor and Outdoor Gnat Control

  1. Use Apple Cider Vinegar Traps
    • Fill a small container with apple cider vinegar and a few drops of dish soap. The vinegar attracts gnats, and the dish soap traps them. Place these traps near infested areas.
  2. Practice Good Hygiene
    • Regularly clean plant pots, garden tools, and workspaces to prevent gnat infestations.
  3. Monitor and Act Quickly
    • Keep an eye on your plants and garden areas. Early detection and intervention can prevent gnats from becoming a major problem.

Conclusion

Gnats can be a persistent problem for plant enthusiasts and gardeners, but with these tips, you can effectively manage and repel them. By maintaining proper soil conditions, using natural repellents, and creating a clean environment, you can protect your house plants and enjoy your outdoor garden without the nuisance of gnats.

Best Fall Veggies to Plant by Growing Zones 6, 7, and 8

As the summer heat begins to wane and the days start to shorten, many gardeners look forward to the cooler temperatures of fall. Fall gardening can be incredibly rewarding, offering a variety of crops that thrive in the cooler weather. Depending on your USDA Plant Hardiness Zone, the best vegetables to plant in the fall can vary. Here, we will explore the top fall vegetables for Zones 6, 7, and 8, along with some states that fall into each zone.

Zone 6

Zone 6 typically experiences a longer growing season than the northern zones but still has to contend with the first frosts arriving in October. This zone includes parts of the following states:

  • MissouriKansasOhio
  • Top Fall Vegetables for Zone 6:
  • Kale: This hardy green thrives in cooler temperatures and can even withstand a light frost, which can make its leaves taste sweeter.Brussels Sprouts: Another frost-tolerant vegetable, Brussels sprouts actually improve in flavor after a frost. Plant them in mid to late summer for a fall harvest.Carrots: Carrots can be planted in late summer for a fall harvest. They benefit from the cooler temperatures, which enhance their sweetness.
  • Zone 7

Zone 7 enjoys a milder climate with a longer growing season, allowing for a wide variety of fall vegetables. States in Zone 7 include:

  • VirginiaTennesseeNorth Carolina
  • Top Fall Vegetables for Zone 7:
  • Spinach: Spinach is an excellent choice for fall planting in Zone 7. It grows quickly and can be harvested well into the cooler months.Broccoli: Broccoli prefers cooler weather and can be planted in late summer for a fall harvest. It is also frost-tolerant.Beets: Beets grow well in the fall and can be harvested before the first hard frost. Both the roots and the greens are edible and nutritious.
  • Zone 8

Zone 8 has a relatively long growing season with mild winters, making it possible to grow many vegetables year-round. States in Zone 8 include:

  • GeorgiaTexasAlabama
  • Top Fall Vegetables for Zone 8:
  • Lettuce: Lettuce varieties such as romaine and butterhead thrive in the cooler temperatures of fall. They can be planted in late summer and harvested throughout the fall.Cauliflower: Cauliflower prefers cooler temperatures and can be planted in late summer for a fall harvest. It is also relatively frost-tolerant.Radishes: Radishes grow quickly, making them an excellent choice for fall planting. They can be harvested in as little as three to four weeks after planting.
  • Tips for Successful Fall Gardening
  • Prepare the Soil: Before planting, make sure your soil is well-prepared. Remove any leftover summer crops and weeds, and add compost or organic matter to enrich the soil.Watering: Fall can sometimes bring less rainfall, so make sure your garden is adequately watered. Consistent moisture is key for healthy growth.Frost Protection: Keep an eye on the weather forecast for early frosts. Use row covers or frost cloths to protect your plants if necessary.Succession Planting: To extend your harvest, consider succession planting. This means planting crops at intervals so that you have a continuous harvest throughout the fall.

By choosing the right vegetables for your zone and following these tips, you can enjoy a bountiful fall harvest. Happy gardening!

A Beginner’s Guide to Growing Herbs in Containers

Starting your own herb garden can be a rewarding and delicious experience. Whether you live in a city apartment or have a spacious backyard, growing herbs in containers is a versatile and accessible way to bring fresh flavors to your kitchen. Here’s a guide to help you get started with some of the best herbs for beginners and how to care for them.

Why Grow Herbs in Containers?

Growing herbs in containers offers several benefits:

  • Space efficiency: Perfect for small spaces like balconies or windowsills.
  • Mobility: Easily move your herbs to follow the sun or bring them indoors during cold weather.
  • Control: Better management of soil quality and moisture levels.

Best Herbs for Beginners

  1. Basil
  2. Parsley
  3. Mint
  4. Chives
  5. Thyme

Getting Started

1. Choose the Right Containers

Select containers with good drainage holes to prevent waterlogging. Terra cotta pots are popular for their breathability, but any container with drainage will work.

2. Use Quality Soil

Use a high-quality potting mix designed for containers. Herbs prefer well-draining soil, so consider adding perlite or sand to improve drainage.

3. Planting Your Herbs

Basil: Basil thrives in warm, sunny conditions. Plant seeds or seedlings in a sunny spot and keep the soil consistently moist but not waterlogged. Pinch off the top leaves regularly to encourage bushier growth.

Parsley: Parsley can be grown from seeds or seedlings. It prefers partial to full sun and regular watering. Soak seeds overnight before planting to speed up germination.

Mint: Mint is vigorous and can quickly take over a garden bed, making it perfect for containers. Plant mint in a partially shaded spot and water regularly. It’s best to start with a seedling rather than seeds.

Chives: Chives are hardy and easy to grow. Plant seeds or seedlings in a sunny spot. They prefer well-drained soil and regular watering. Harvest by snipping off the leaves close to the base.

Thyme: Thyme is a drought-tolerant herb that thrives in full sun. Plant seeds or seedlings in a sunny spot with well-draining soil. Water sparingly, allowing the soil to dry out between waterings.

4. Caring for Your Herbs

Watering: Most herbs prefer consistently moist soil, but overwatering can lead to root rot. Water when the top inch of soil feels dry.

Feeding: Herbs generally don’t require much fertilization. A light feeding with a balanced, water-soluble fertilizer once a month during the growing season is sufficient.

Pruning: Regular harvesting encourages new growth and keeps herbs bushy. Pinch off the top leaves and flowers to prevent bolting.

Sunlight: Most herbs need at least 6 hours of sunlight daily. If growing indoors, place them near a sunny window or use a grow light.

Pest Control: Check your plants regularly for pests like aphids and spider mites. Use organic methods such as neem oil or insecticidal soap to keep pests at bay.

5. Harvesting Your Herbs

Harvest your herbs in the morning after the dew has dried but before the heat of the day. Use sharp scissors or pruning shears to avoid damaging the plant. Regular harvesting encourages bushier growth and prevents flowering, which can make some herbs bitter.

Conclusion

Growing herbs in containers is a delightful way to enhance your cooking with fresh flavors while enjoying the satisfaction of nurturing plants. With these tips, you’re well on your way to a thriving herb garden. Happy gardening!

Home is Where the Boat Is

Potting, Puttering & Pontooning

Cats and Trails and Garden Tales

Musings on cats, travel, gardens and life

Leaf And Twig

Where observation and imagination meet nature in poetry.

phillipsplace

A new beginning, mobile home living, adding our style inside and out.

Ruth E. Hendricks

Daily Journal of Life in Pittsburgh

The Haute Mommy Handbook

Motherhood Misadventures + Creative Living

Suzanne's Mom's Blog

Arts, Nature, Good Works, Luna & Stella Lockets & Birthstones

Sarah Rajkotwala - Author & Spiritual Teacher blog

Gardening Fairies Flowers Spirituality Angels Love Joy

Ideas and Advice for How To Live a Joyful and Empowered Life.

All Things Empowering - Healing Ourselves & Earth, Self-Sufficiency, Food Forests, Gardening, Art, Road Trips, Preserving, Foraging, Permaculture, Homesteading and More!

AmericaOnCoffee

We’re just inviting you to take a timeout into the rhythmic ambiance of our breakfast, brunch and/or coffee selections. We are happy whenever you stop by.

Heart to Hearth Cookery

Sharing my Experimental Archaeology of Food

The Herb Society of America Blog

Learn β€’ Explore β€’ Grow