Pressed flower lantern jars

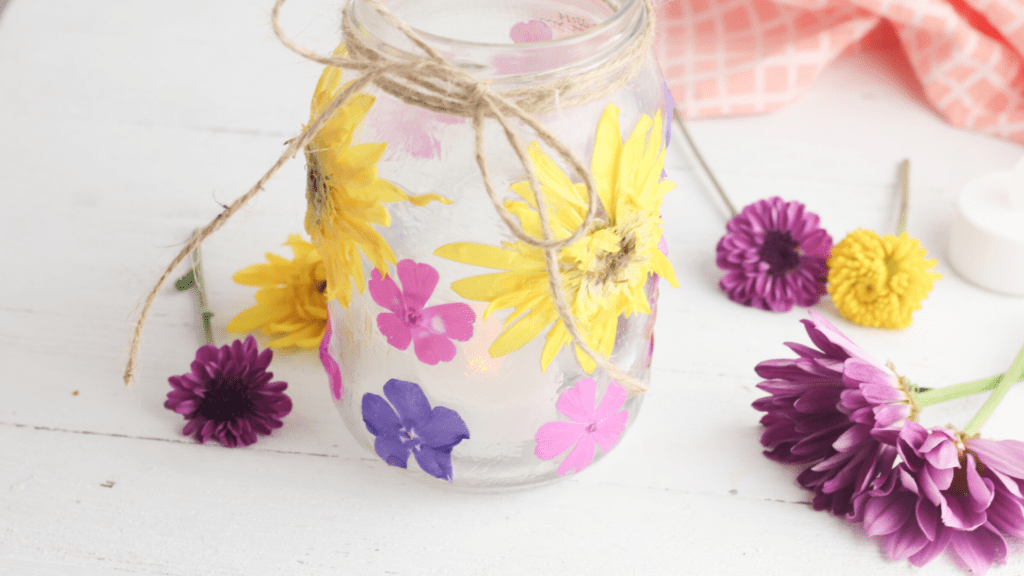
Make your own pressed flower lanterns that are beautiful, and really easy to put together! With a bit of mod podge and dried flowers you have a gorgeous candle holder. These pretty luminaries are perfect for lighting up summer and autumn evenings indoors or out!

If you are looking for DIY party decorating ideas, these glass jar lanterns will make a lovely table decoration. Hang them up outside in the trees as  a rustic look. 
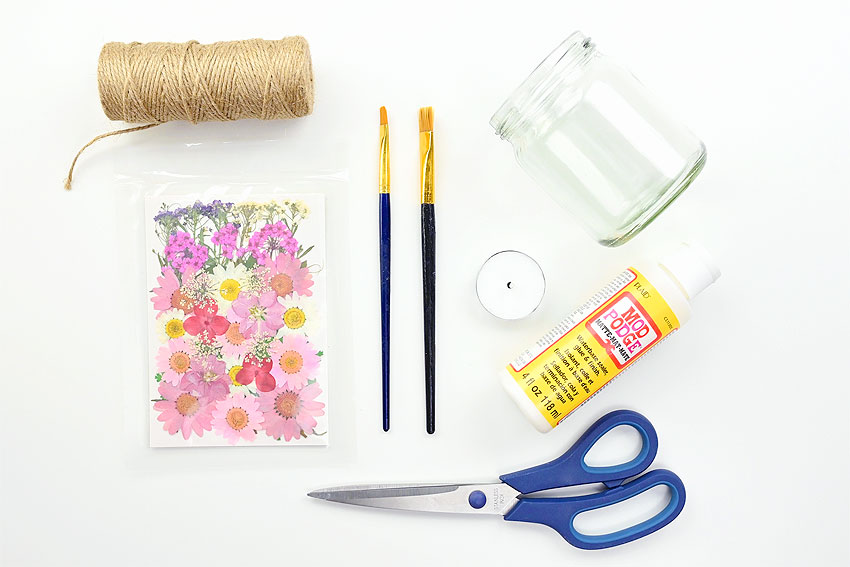
MATERIALS

  • Glass jars
  • Pressed flowers
  • Scissors
  • Mod Podge or any craft glue which dries translucent
  • Sticky Tape
  • Paintbrush
  • Tea lights or LED tea lights

First add a layer of mod podge on the outside of the jar.   Then start adding some pressed flowers around the jar.  Be careful – the pressed flowers are very delicate and can easily fall apart. I find it’s best to use tweezers to attach the pressed flowers to the glass jar. Keep adding craft glue and flowers to the glass jar until you are happy with your design.

The glass jar lanterns with pressed flowers need sealing so that we can use them outdoors. To seal our luminaries, we will paint another layer of craft glue over the pressed flowers and let dry.

If you want to add wire for hanging try this step: take the silver florist’s wire and twist it around the top of the glass jar lantern a few times and tie it off.

Next, take another length of the florist’s wire and twist it underneath the wire that you just attached to the rim of the lantern. Bring the wire over to the opposite side of the glass jar lantern and (leaving a loop for the handle) tie it off on that side. You can add twine as well to finish the look. 

Then hang in the trees or leave the wire off and place jars on tables. 

Low cost containers

Container gardening doesn’t have to cost a fortune, just only a little imagination. You could find beautiful garden containers at your local garden shops with rays of rainbow colors that are eye-catching, but can be expensive. Luckily, you don’t have to empty your wallet to create a beautiful container planter with materials that you already have around the house such as; baskets, boots, and buckets. By recycling an item into a new and different use can create a quirky and add personality to your flowers.  

Loved boots… you might have walked many miles in your boots that you have worn holes into the soles, if you haven’t; drill a few small holes for drainage in the bottom. Fill the boots with a good potting mix.  Next, choose an upright focal point plant for example a small primrose with an ivy plant that could cascade sideways over the boot. You could add fillers like violas for a color accent. Water and make sure your plants have enough sunlight to help your flowers bloom.

Blooming basket.. The basket filled with herbs can brighten a sunny balcony or porch and add flavors to your favorite recipe.  Find a basket that can be wide enough to add at least 3 herbs. At the beginning you should add a shallow plastic container pan inside the basket to help hold the soil. Next, fill the basket with a potting mix. You can add short and bushy herbs such as sage, parsley, and thyme. Water and make sure your herbs have enough sunlight to flourish. 

Cascading bucket..  A barrel of flowers cascading into your garden is a clever way to pack color into an area of poor compact soil. YOu can choose to use colorful blooms or even colorful succulents.  To create, set the bucket/ barrel down on its side on landscape fabric to serve as a weed barrier. Position it so it blends naturally into your garden. Drill holes in the bucket that will have the soil pressed into it. Add fresh potting mix soil inside the bucket and then add your plants by cutting a slit into the fabric for the plant roots to go into the ground. Once the bucket/ barrel is planted, water with liquid fertilizer to help your plants flourish. 

These simple and easy containers can give a unique personality to your garden. You can read more container gardens in our garden blogs…Gardening with Junk

Cottage Witch Teas

Herbal teas are teas made from plants, seeds, flowers, roots or fruits .They have been used as natural home remedies for thousands of years.  Making and drinking tea with intentions can help replenish your body , mind , and soul. Discover below 3 teas that can be made easily in your kitchen.

Tea with Hearth Witch “ Spiced Chai Tea” create this warm tea by using: 4 cups of water, 2 tablespoon of Chai tea, 2 cinnamon sticks, ½ teaspoon dry ginger, ½ teaspoon cinnamon

Mix all the ingredients together in a pot and simmer then serve in your favorite tea cup.

Goddess Witch Tea “ Honey Herbal Tea” Create this sweet  tea by using: 4  cups of water, 2 tablespoons of Chamomile, 1 teaspoon of honey, 1 cinnamon stick, 1 teaspoon of dried or fresh blueberries. Mix all the ingredients together in a pot and simmer then serve in your favorite tea cup.

Cottage Witch Tea “ Roseberry Tea” Create this aromary tea by using: 4 cups of water, 4 tablespoons of food grade dried roseberrys ( found online) or in herbal grocery stores, 1 tablespoon dried or fresh cranberries. Mix all the ingredients together in a pot and simmer then serve in your favorite tea cup. 

  *If you decide to use herbs for any health condition, even the minor ones, with herbal remedies, always consult your doctor. Teas that may be completely safe to some people may cause serious side effects in others.

DIY REED DIFFUSERS

Create an easy natural diffuser for any space in your home or office. No need to light a candle to fill your space with scent, creating  these diffusers  will continually release their delicate scents. 

Display your reed diffuser in a high traffic area where the fragrance can disperse throughout the room with air circulation. It depends on the essential oil fragrance because some reed diffusers are not meant to scent an entire room! Think of reed diffusers like a flower bouquet — you’ll periodically get random whiffs of fragrance. To refresh the scent you would flip your reeds for more fragrance throw, the more reeds you flip and the more often you flip them the faster the fragrance oil will dissipate.

What you will need:

Twigs

Essential oils

Almond oil

Glass or plastic jar/vase

First collect small dry twigs that will fit perfectly inside your jar/ vase

Secondly, bake all collected twigs at 200 F for 45-60 minutes. 

Third, let twigs cool after baking and then use a peeler to peel bark off each twig

Fourth, mix ¼ cup of almond oil and 6 tsp of any choice essential oil and then pour into your jar/vase

Fifth, Insert your peeled twigs into the mixture jar/ after 15 min flip twigs

Then enjoy your own special fragrance 

  •   Use caution when flipping reeds over furniture, fragrance oils can leave marks. I suggest flipping reeds over a sink or trash can & Flip twigs every 3 days to refresh the scent
  • As twigs draw the oils they may change color, this is a sign they are working and filling your room with fragrance- exactly as they were designed to do!

You can create this with little cost and it is an easy way to bring nature into the home!

Our Etsy shop: Printhousedesign1 will be offering DIY diffusers kits starting in Sept.

Bluebonnet

Did you know that there are actually six native species of bluebonnet that grow in Texas and that all six of them are collectively classified as Texas’ state flower? There’s Lupinus texensis, of course, which is the bluebonnet that we all know and love. However, according to the Native Plant Society, Texas is also home to four other species: Lupinus subcarnosus, Lupinus Havardii, Lupinus concinnus, Lupinus perennis, and Lupinus plattensis

.

Texas bluebonnets are annual plants, meaning they go from seed to flower to seed in one year. They germinate in the fall and grow throughout the winter, and usually bloom around the end of March to the mid-May. Around mid-May, they form a seedpod, which is green at first but turns yellow and then brown.

Texas bluebonnets are adapted to the rocky, alkaline soils of the Hill Country  and to its frequent droughts. In fact, they thrive in heavily disturbed, poor soils and full sun.  As for watering your bluebonnets, if possible, using light, well-spaced waterings. Although bluebonnets require some moisture to germinate and grow, they do not like saturated soil. If fall or winter rainfall is low, an occasional watering will help ensure success.  As you know nature always has a way of surprising us. Just when you think you have something figured out, nature throws you for a loop every time. For example, bluebonnets are quite simply blue and white flowers, correct? Wrong. Most bluebonnets are blue and white, but the flowers actually come in varying shades of pink, purple, and white as well! 

We will be adding more blogs about this beautiful Texan flower next week!

Home is Where the Boat Is

Potting, Puttering & Pontooning

Cats and Trails and Garden Tales

Musings on cats, travel, gardens and life

Leaf And Twig

Where observation and imagination meet nature in poetry.

phillipsplace

A new beginning, mobile home living, adding our style inside and out.

Ruth E. Hendricks

Daily Journal of Life in Pittsburgh

The Haute Mommy Handbook

Motherhood Misadventures + Creative Living

Suzanne's Mom's Blog

Arts, Nature, Good Works, Luna & Stella Lockets & Birthstones

𝑻𝒐𝒓𝒏𝒂𝒅𝒐 𝑶𝒇 𝑪𝒉𝒂𝒐𝒔 🌪

Thoughts, experiences and learnings in a turbulent time

Sarah Rajkotwala - Author & Spiritual Teacher blog

Gardening Fairies Flowers Spirituality Angels Love Joy

Ideas and Advice for How To Live a Joyful and Empowered Life.

All Things Empowering - Healing Ourselves & Earth, Self-Sufficiency, Food Forests, Gardening, Art, Road Trips, Preserving, Foraging, Permaculture, Homesteading and More!

AmericaOnCoffee

We’re just inviting you to take a timeout into the rhythmic ambiance of our breakfast, brunch and/or coffee selections. We are happy whenever you stop by.

Heart to Hearth Cookery

Sharing my Experimental Archaeology of Food

The Herb Society of America Blog

Learn • Explore • Grow