How to grow avocado tree

First clean and prepare the pit by suspending it in a glass of water using 3-4 tooth picks along the sides of the avocado pit, for the bottom to hang into the water. Which side of the avocado seed goes in the water?

The toothpicks should be supporting the seed so that the pointed half is out of the water and the bottom half is in the water. The sprouting tip will come out of the pointed end, so be sure the flat end is immersed in water.

Next place the glass with pit in a sunny window sill and change the water every other day. Make sure the water is at room temp. The pit will split after two weeks at this time carefully pull off the skin.

Four to Eight weeks later the stem will start to break and rise up from the middle of the pit. The roots should be growing and at this time is when you will take it out of the water and plant it into soil.

Remember the stem should be at least 8-10 inches from the pit and at this time is when you should plant. The stem should have tiny leaves as well.

Place the pit so half of it is covered into the soil and press firmly around it. You can start off by planting the small avocado in a container in a sunny location outdoors.

Remember to keep your new little plant in a sunny location and watered to help it flourish and grow into a tree.

Blooming Air Plants

Do air plants bloom flowers?

Yes, every air plant will only bloom once in its lifetime. Once the flower has dried up, you should trim off the entire flower stalk, as this will promote “pupping. Tillandsia “Pups” are simply new plants forming at the base of the plant.

How do I get my air plant to bloom?

Most healthy Tillandsia will bloom eventually, but they require proper care and plenty of light in order to do so. To help speed up the blooming process, you can use a diluted fertilizer like our specially formulated Air Plant Food once per month or so to encourage blooms and pup production.

How long does it take for air plants to bloom?

In their natural habitat, it takes much longer for the air plants to bloom. The time of the bloom varies even in the same species of air plants let alone in different types. The same species of air plants that might bloom in 5-7 years in one environment might take around 25 years to bloom in another environment.

Flowering is the peak of the air plant life cycle, but also marks the beginning of the plant’s old age -after it flowers, the plant will eventually die. But don’t despair! Just before, during or after flowering, depending on the species, your air plant will reproduce by sending out 2-8 “pups”.

You can buy air plants at your local garden shop or at our Etsy shop http://www.printhousedesign.com

DIY Butterfly Feeders

If you are looking to add more butterflies to your garden this year, you may need to reevaluate the plants that you have in your flower garden. Or, you could just make your own DIY butterfly feeder and I have a list  to make ones that you can try.

Adding a butterfly feeder to your garden adds instant décor, especially if you try these DIY butterfly feeders. All of these are really decorative and beautiful. Plus, when you fill them with nectar, they attract so many butterflies! Butterflies are essential for helping to pollinate many flowers and plants and let’s face it, there is just nothing as lovely as seeing several butterflies in your yard. Adding a butterfly feeder to your garden is going to help you to attract these creatures and they will do the rest. 

You don’t have to have a jug or buy materials to make a great butterfly feeder. You can upcycle some old glass dishes to create one that is just as gorgeous as it is functional. Just grab those old glass plates, glasses, teacups or whatever you have on hand and fashion them into a lovely feeder that you can stand in your garden. This one is really easy to make and it is so gorgeous – plus it is a wonderful way to up cycle those old glass dishes.

This is a great project for the kids. You can take an old pie tin – one of the cheap ones that comes with premade pie crust – and turn it into a lovely DIY butterfly feeder. Let the little ones help you to create a hanger from beads and twine and then decorate the tin however you want. Butterflies will flock to this one and they can all eat at the same time so you may see hoards of them hovering over your garden at feeding time.

The next time you empty a can of something, save the can. You can turn it into a lovely hanging butterfly feeder. This one won’t cost you anything to build and it is a wonderful way to upcycle tin cans. Just decorate however you want and then fill the can with flowers and other items that butterflies love to eat. This is a great project for the kids, too and they can help to make sure that the can always has food for your butterflies.

You can DIY a butterfly feeder that also gives the little creatures the water that they need. I love how easy this one is. You just stack a couple of plates or terra cotta pieces and then hang them together. The top plate will be used to hold water and you can add nectar or fruit pieces or flowers that your butterflies love to eat to the bottom section. It’s an all in one buffet for your butterflies!

Hope these little ideas help you attract more butterflies to your flower garden this season.

Creating a Sandy Terrarium

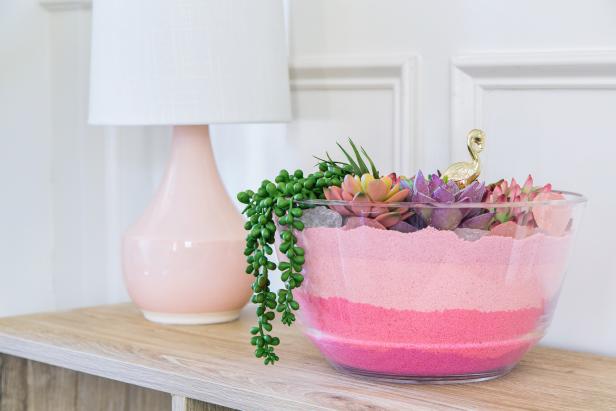
With so many amazing containers and varied ways to create them, terrariums are standing the test of time. Today I’ll show you another fun way we’ve come up with for creating sand terrariums—these adorable table-top gems. 

Succulents.

Typically, we don’t recommend succulents or cacti for terrariums. They don’t like being wet or cooped up inside a glass house. But everyone loves them, they look great as specimens (as opposed to leafy ferns and other plants that thrive in terrarium conditions), and they’re really easy to plant.

So, if you’re going to use them, only water the actual plant in small amounts (a turkey baster is a great tool for this), never cover the terrarium or put them in a cloche, and accept this simple philosophy: You might kill the plant, but remember how much fun you had making your terrarium.

Things you’ll want for making your terrarium.

After you’ve picked the succulents you want to use, you’ll need to gather a few other items to begin. Using moss and little bits of driftwood for decorating can be a great accent with the plant.

Buy sand from a craft store.

Craft sand comes in many colors and you can have a lot of fun with this. Get at least three choices that complement each other and make you happy.

Start layering your sand.

Find a glass container that you like. (We prefer one that has a top large enough to work with and sides that are straight so you can really see the sand design.) Lay down your base layer of sand evenly across the bottom.

Building the layers of sand by pouring the different colors of sand in piles all around the sides of the terrarium.  Be careful not to fill up the center. When you’ve got the sand to a height you’re happy with, lay down a layer of pebbles to help with drainage and to keep the sand stable for when you add your plants.

Then you want to add your soil. Always use cactus mix as it’s much looser than normal potting soil and works better for succulents. You don’t need much; just add an inch or so and then make a little hole in the center. Do this by pushing the soil down (and maybe taking a tad out). This is why you don’t want too much sand in the middle.

Pull your succulent out of its container (2″ varieties work best) and shake off as much soil as possible without damaging the roots. Place it into the hole in your soil. Do this with as many plants as you can fit (or just use one if you’d prefer). Don’t worry about the plants being crowded… most succulents actually like that. Add another layer of pebbles to finish the top. Here’s where a paint brush comes in handy. It helps even everything out. Now you have one very cute terrarium that you made yourself.  Soon you will be able to purchase terrariums at our Gardenocity Shop and you can find succulents to purchase there as well.

Growing Pineapple sage

With its pretty bright red flowers, pineapple sage is named for the aroma and taste of pineapple when its leaves are crushed. It is a member of the mint family, and native to the mountains of Mexico and Guatemala.

How to grow

Pineapple sage grows best in a fully sunny area and evenly moist soil. Plant it where you would like to attract butterflies and hummingbirds. You can propagate by planting rooted cuttings in pots, over wintering them indoors in a sunny location, and then plant in the garden in the spring.

Pineapple sage benefits cabbage, broccoli, cauliflower, Brussels sprouts, kale and kohlrabi by repelling a host of bothersome insects. It repels cabbage loppers, cabbage maggot, black flea beetles, cabbage moths and imported cabbageworms — all insects that infest cabbage and related vegetables.

The fragrance may lead one to wonder is pineapple sage edible? Indeed it is. Leaves of the pineapple sage plant may be steeped for teas and the minty-tasting blossoms can be used as an attractive garnish for salads and desserts. Leaves are best used fresh. The leaves make a lovely hued pesto and  your dogs can safely enjoy them as well. … Marigold, Pineapple Sage, and Impatiens are also wonderful garden plants to add to your collection.

What is your favorite herb to grow?

Home is Where the Boat Is

Potting, Puttering & Pontooning

Cats and Trails and Garden Tales

Musings on cats, travel, gardens and life

Leaf And Twig

Where observation and imagination meet nature in poetry.

phillipsplace

A new beginning, mobile home living, adding our style inside and out.

Ruth E. Hendricks

Daily Journal of Life in Pittsburgh

The Haute Mommy Handbook

Motherhood Misadventures + Creative Living

Suzanne's Mom's Blog

Arts, Nature, Good Works, Luna & Stella Lockets & Birthstones

𝑻𝒐𝒓𝒏𝒂𝒅𝒐 𝑶𝒇 𝑪𝒉𝒂𝒐𝒔 🌪

Thoughts, experiences and learnings in a turbulent time

Sarah Rajkotwala - Author & Spiritual Teacher blog

Gardening Fairies Flowers Spirituality Angels Love Joy

Ideas and Advice for How To Live a Joyful and Empowered Life.

All Things Empowering - Healing Ourselves & Earth, Self-Sufficiency, Food Forests, Gardening, Art, Road Trips, Preserving, Foraging, Permaculture, Homesteading and More!

America On Coffee

We’re just inviting you to take a timeout into the rhythmic ambiance of our breakfast, brunch and/or coffee selections. Enjoy!

Heart to Hearth Cookery

Sharing my Experimental Archaeology of Food

The Herb Society of America Blog

Learn • Explore • Grow